Signage & LED Strip Lighting Factory Since 2011

Signage & LED Strip Lighting Factory Since 2011

Why is my LED strip not working after I cut it

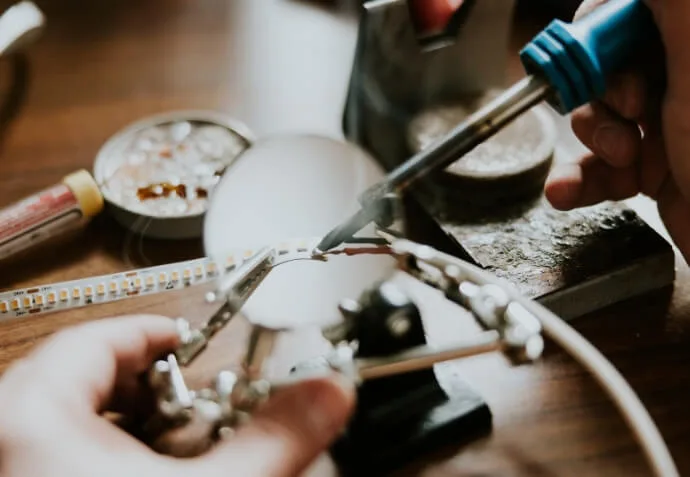
It’s quite common that LED strips stops working after being cut, especially for those people who dose not have much experience on DIY. On the condition that the strips do work before cutting, here are the potential causes and solutions.

Parts of LED strip is not working

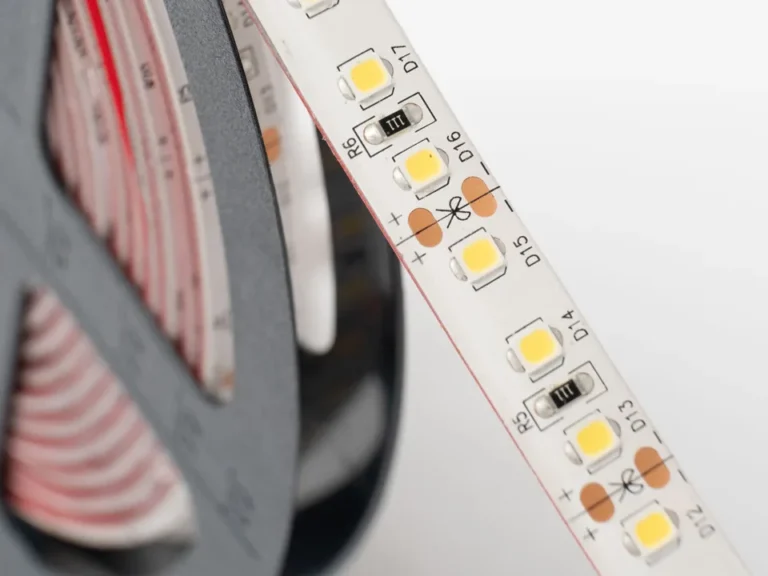
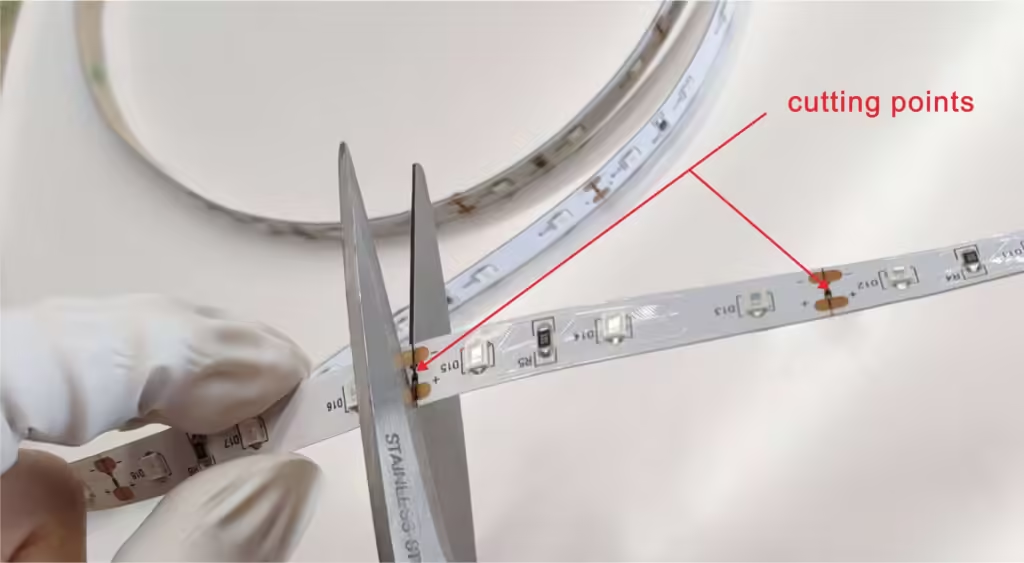
1. Incorrect cutting point

Cause: Flexible LED strips is cuttable, usually the cutting points is marked by a line or a scissor icon. Cutting the strip at any point other than the designed points can break the circuit, which causes this unit of the strip not working.

Solution: Cut off this damaged unit at correct cutting point, expand another unit on strip by soldering or solderless connectors if needed.

Incorrect cutting point

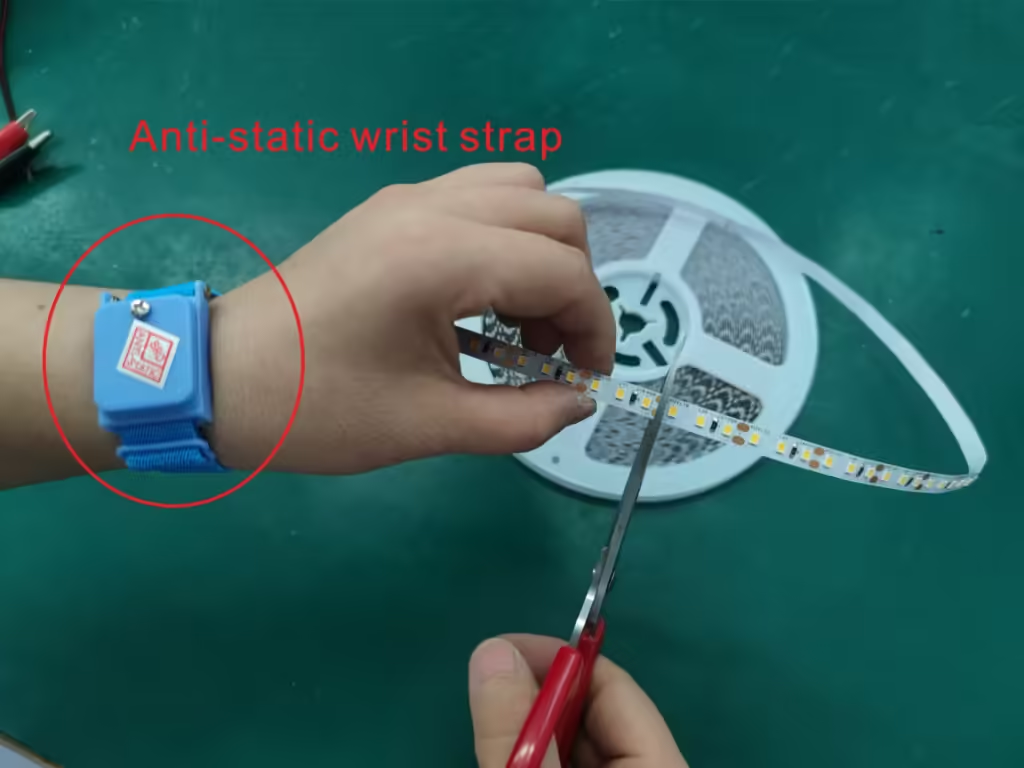
2. Electrostatic damage

Cause: Static electricity creates high-voltage spike which easily breakdown LED chip’s P-N junction, it happens by touching soldering pad or LED chips directly.

Solution: Put on anti-static wrist strap before cutting, other static elimination works as well.
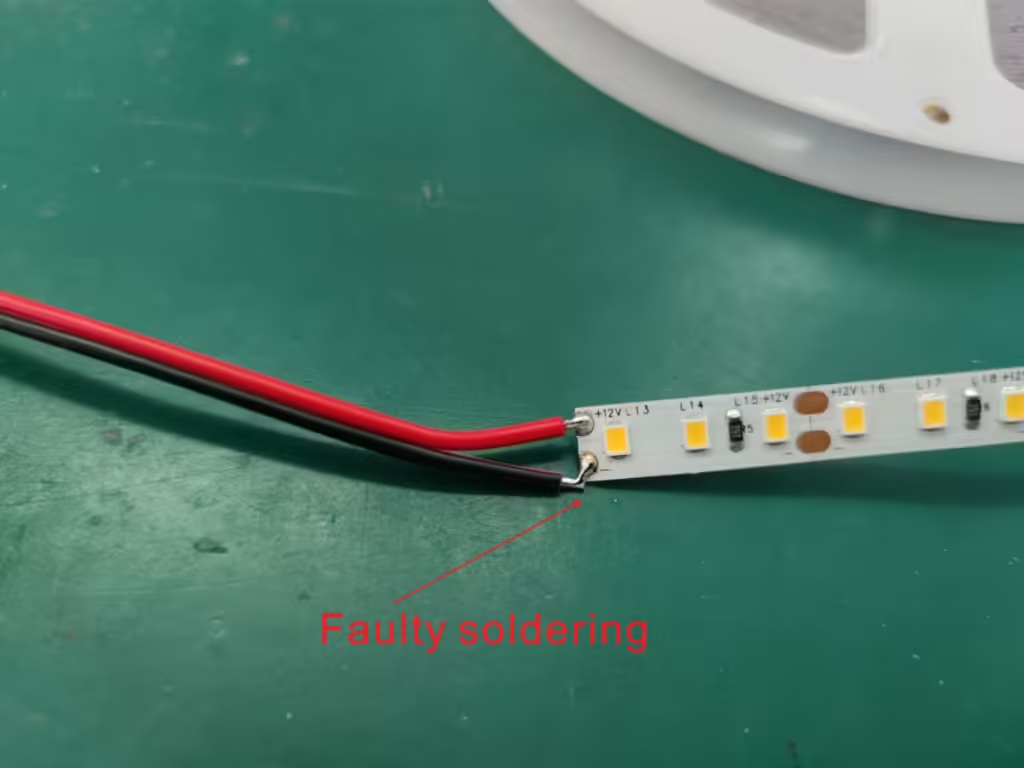
Electrostatic damage

3. Connection issue

Cause: When connect two strips together after cutting, faulty soldering or bad connection by solderless connectors leads to the following strips not working.

Solution: Inspect the solder joints, re-solder the weak joints; Replace connectors, ensure it fits well and tight.

Connection issue

Entire LED strip is not working
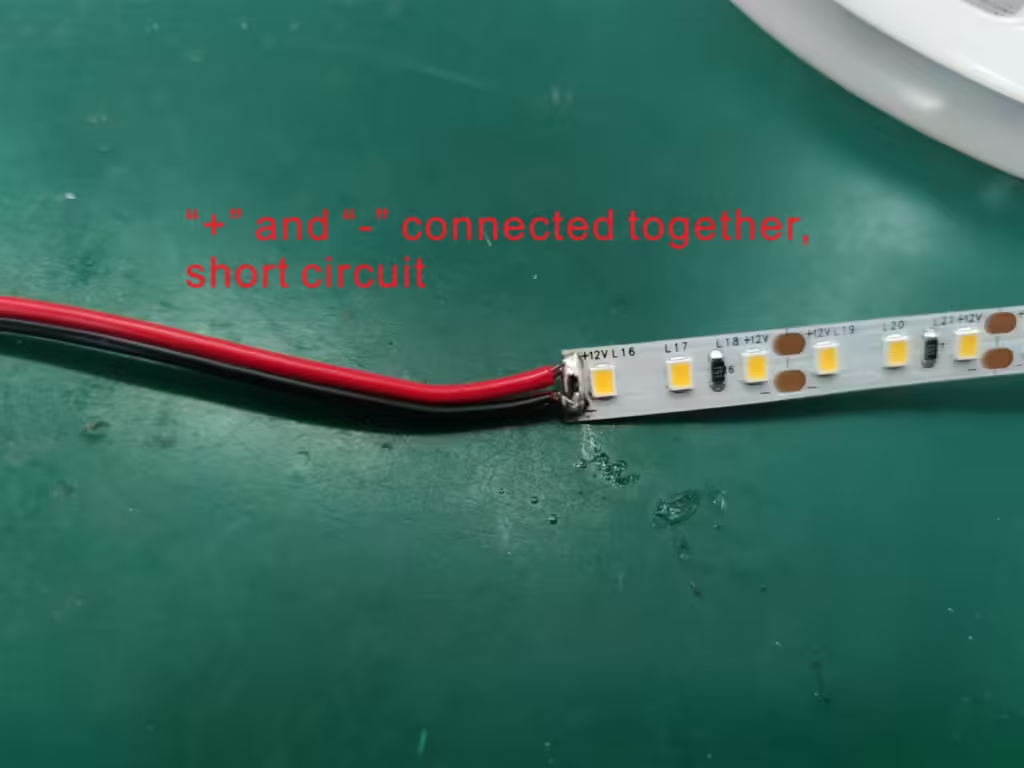
1. Short circuit

Cause: Forget to turn off the power while cutting the strips or solder positive and negative polarity together accidentally, this short circuit creates surge current which burns LED chips;

Solution: Disconnect strips to LED driver before cutting; Check if there is any soldered joints problem.

Short circuit

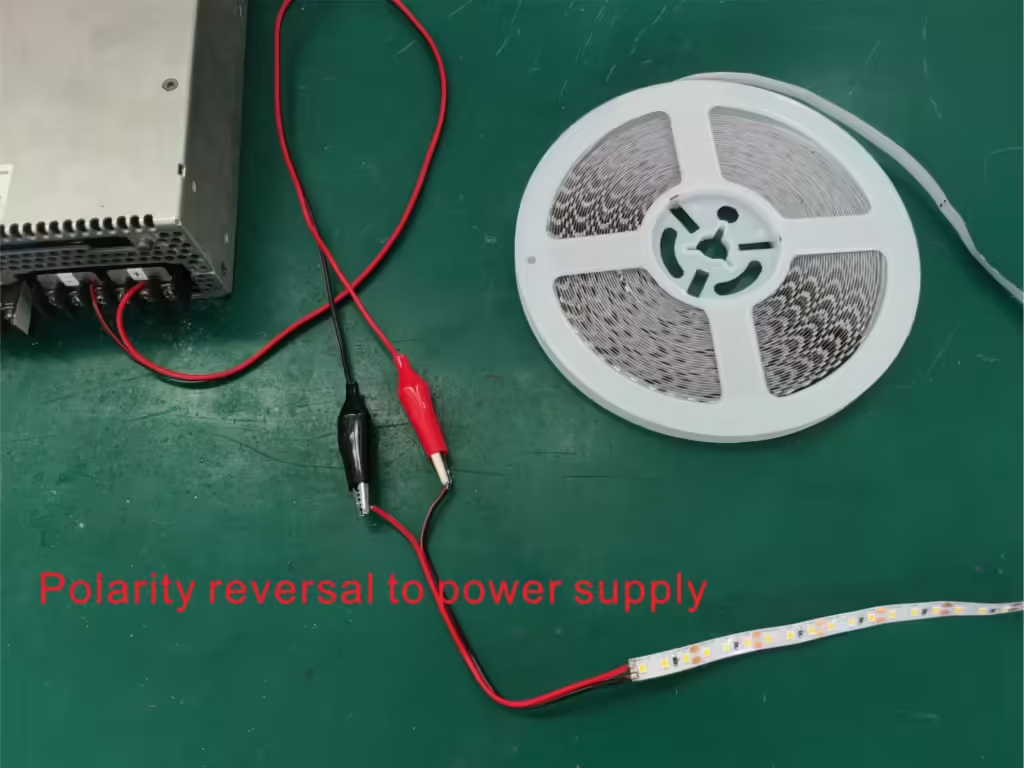
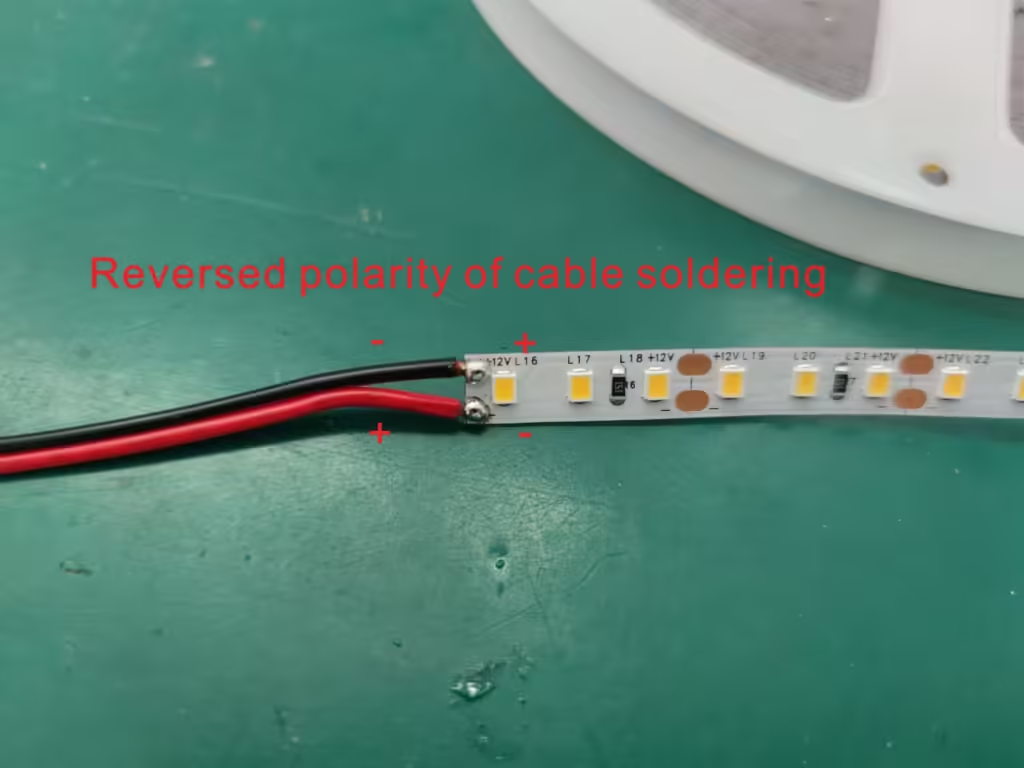
2. Polarity Reversal

Cause: a. Reversing the polarity when connect strips to LED driver.

   b. Reversing the polarity when solder cable or use solderless connectors. Such as “+” and “-” mixed or “R”, “G”, ”B” and “+” mixed.

Solution: Double check polarity of cable and soldering joints before power on.

Polarity reversal to power supply
Reversed polarity of cable soldering 2

3. Connection issue

Cause: Cable is not soldered to strips well or connectors does not fit strips well may cause incomplete electric circuit

Solution: Make sure the connectors or soldered joints are properly aligned and securely attached to the copper pads. If using snap or solderless connectors, ensure they are compatible with the strip’s width and pin configuration.

4. Power supply issue

Cause: After cutting and reconnecting LED strips, the power supply might not provide adequate voltage or current, especially if the strip length has changed significantly.

Solution: Calculate how much power the new strip need, change power supply if the old one is not powerful enough.

Additional tips:

1. Disconnect power supply before cutting and reconnecting.

2. Check all the solder joints and other connections before power on.

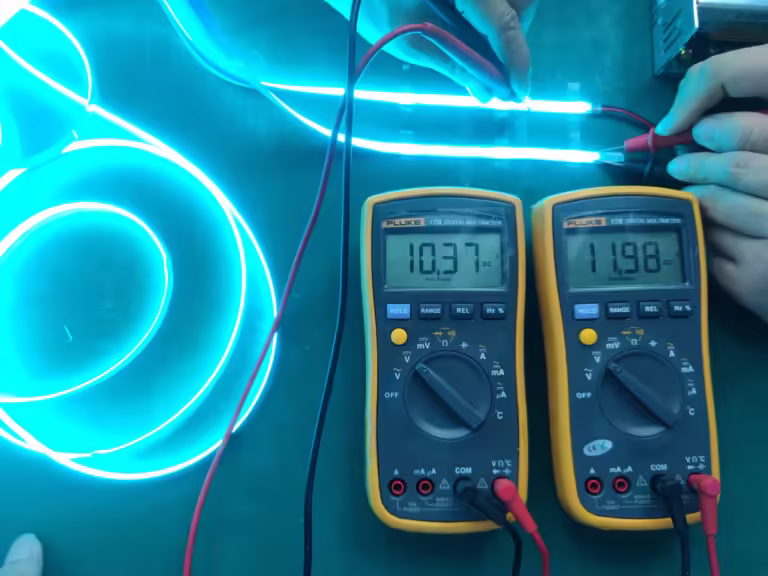
3. Prepare some equipment, anti-static wrist strap for static elimination, multimeter for measuring voltage and current, checking if the solder joints is shorted.

4. Contact us for help.

LED PCB Board ManufacturerLED PCB Board Manufacturer
2026 Top 10 LED PCB/FPCB Board Manufacturer in China
China remains a global leader in PCB and FPCB manufacturing in 2026, making it one of the strongest sourcing regions for OEM buyers looking for reliable LED PCB boards and LED FPCB boards at scalable production capacity. Rigid LED PCBs (such as aluminum MCPCB and FR-4) are mainly used when strong...
surge protective devicesurge protective device
Does Your Surge Protective Device Still Work? When to Replace It
Yes, surge protective devices do wear out. Even when there is no visible damage and the device still appears powered, its protective components degrade with every surge event. Replacement timing is therefore not based on calendar age alone. It depends on cumulative electrical stress, exposure conditions, and system criticality. Assuming...
led pcb designled pcb design
LED PCB Design for Horticulture Lighting: Spectrum Planning, Thermal Design & Layout Guide
LED PCB design for horticulture lighting focuses on creating stable, long-duration lighting systems that operate reliably in controlled grow environments. Unlike general lighting, horticulture systems must support continuous photoperiods, manage sustained heat within enclosed fixtures, and deliver consistent electrical performance over entire growing cycles. The way the LED PCB is...
LED Grow Lights for Strawberries: What You Need to Know Before Growing
Strawberries are no longer just a seasonal fruit—thanks to modern cultivation techniques, they can now be grown year-round in greenhouses and indoor farms. One of the key technologies making this possible is the use of LED grow lights. By providing the right spectrum and intensity of light, growers can improve...
Indoor LED Grow Light GuideIndoor LED Grow Light Guide
Indoor LED Grow Light Guide: PPFD, Spectrum, and Lighting Tips for Healthy Plants
In the current market, there are numerous LED plant lighting products available, and their appearances may be similar. However, there are significant differences in their actual performance, primarily in terms of short lifespan, with some products failing after just a few dozen hours of use or experiencing severe light decay...
SMD5050-60LED-10MM-RGBIC_240715SMD5050-60LED-10MM-RGBIC_240715
How to fix the issue of LED strip lights falling?
What causes the installed light strip to come loose? 1.Inadequate strip fixing: When installing LED strip lights, if the 3M adhesive is left in place for an extended period of time due to wind and rain, the viscosity of the glue will decrease, turning off the LED strip lights. 2.Paste position and...

Share:

Facebook
Twitter
Pinterest
LinkedIn
Subscribe
Notify of
guest
0 Comments
Oldest
Newest Most Voted
Inline Feedbacks
View all comments

Search SignliteLED Blog

Categories

To top

Get a Quote Now