Programmable LED strips are great when you are looking for a dynamic lighting solution for your project. They come in different colors, can be installed almost anywhere, and are low maintenance. You’ll be hard pressed to find another lighting solution that offers so much value and style.
Programmable LED strips take the standard to a whole new level, and they give you more control options and cool effects to dazzle your lighting setup. The catch is that you need to choose the right addressable LED strip for your needs. Don’t worry if you’re not sure how to make a decision; read on to learn all about choosing programmable LED strips.
1. What is a Programmable LED Strip Light?
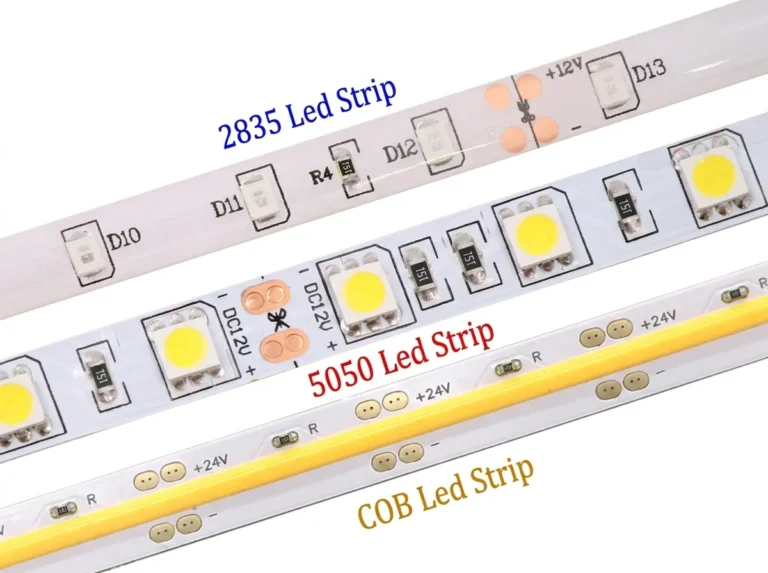
Programmable LED Strip, also called Addressable LED Strip, is a digital strip containing a strip flexible circuit board, LEDs, and a driver IC chip. “Programmable” means that a control program can be written to individually control the color and brightness of each LED or group of LEDs, thanks to the integrated circuits (ICs) embedded in, or connected to, each LED. integrated circuits (ICs) embedded in or connected to each LED.
Programmable (addressable) LED strips are available in a variety of formats, including different lengths, LED densities (number of LEDs per meter), and color capabilities ranging from RGB (Red, Green, and Blue) to RGBW (Red, Green, Blue, and White) for added color mixing and white light options.
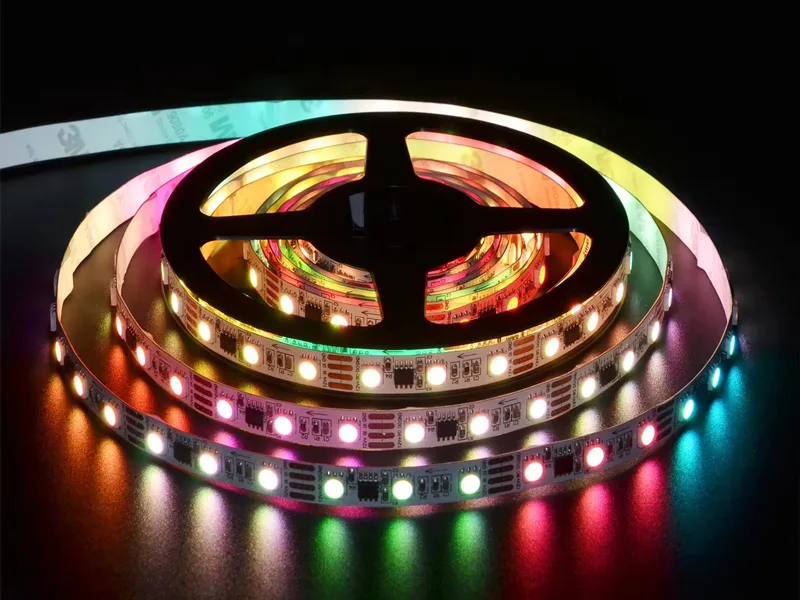
There are two main types of ICs used in programmable LED strips: miniature ICs built into the LED structure and ICs placed outside of the LED’s. Below is a picture of a programmable LED strip:
1.1 Built-in IC and external IC
Built-in IC refers to the integration of internal circuitry in the LED, reducing external circuit design, external components, and production costs. An IC can control a LED to achieve multiple color changes.
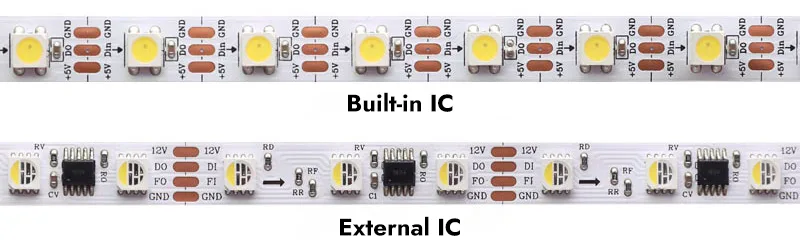
External IC, on the other hand, is our common form of stand-alone integrated circuits. This external design provides greater flexibility in terms of maintenance and customization, as individual components can be replaced or modified more easily. An external IC controls one or more LEDs, usually three or six.
1.2 Programmable (Addressable) IC Types
Programmable (addressable) ICs are categorized into DMX512 ICs and SPI ICs according to their control protocols. DMX512 is an international standard protocol, and the performance of different DMX512 ICs may vary, but the supported protocols are the same, which means that the same DMX512 controller can control different types of DMX512 ICs; however, SPI is not an international standard protocol, and the supported protocols are different for different manufacturers. However, SPI is not an international standard protocol, and SPI ICs from different manufacturers support different protocols, which means that different SPI ICs may need to be used with different SPI controllers.
Common SPI built-in IC models: WS2812B, WS2813, WS2815, SK6812, SK9822, APA102, APA107, and so on.
Common SPI external IC models: WS2801, WS2811, WS2814, WS2818, UCS1903, TM1812, TM1814, TM1914, TM1934, LPD6803, LPD8806, and so on.
Common DMX512 external IC models: TM512, UCS512, and so on.
For related IC datasheet downloads, please click here.
2. Programmable LED Strip VS Non-Programmable LED Strip
Programmable LED strip can be regarded as the upgraded version of non-programmable LED strip.
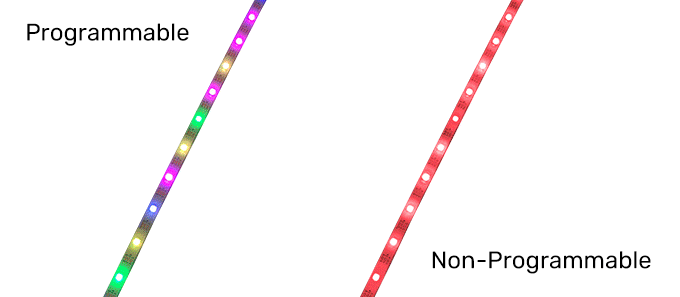
Ordinary LED light strip can only realize the whole strip of light color jump and single color brightness adjustment; the whole strip of light at the same time can only present a color and cannot exist at the same time in two different colors.
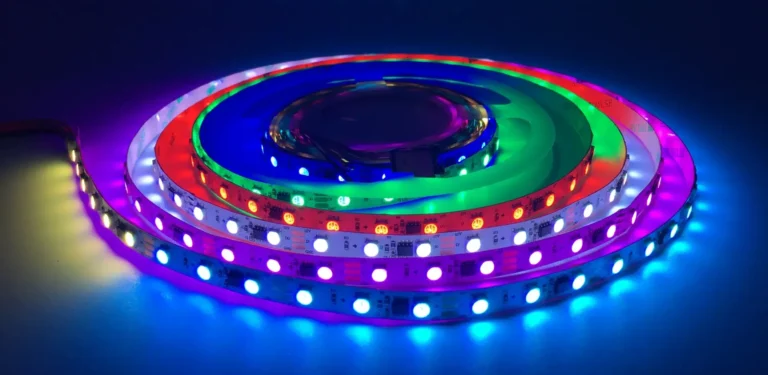
On the contrary, a programmable LED strip can achieve various color changes through the control system, including color chasing, multi-color cycling, single-color walking, and so on. These color change modes are often programmed by engineers using programmable controllers and embedded into the controller IC board. All we need to do is power the programmable strip, connect the programmable LED controller, and play the programmed pattern.
3. What are the Types of Programmable LED Strips?
Programmable LED strips according to the built-in or external IC signal can be divided into single-signal strips, double-signal strips, breakpoint transmission series, and DMX512 strips; these four types are different.
3.1 Single-Signal Programmable LED Strips
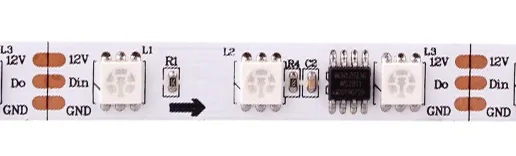
A single-signal programmable LED strip can only pass one kind of signal; one IC control area is called a pixel point. When one of the pixel points is broken, the other pixel points will not work, so its connection point is a positive wire, a negative wire, and a signal wire.
- 12V: positive wire
- Din/Do: data signal wire
- GND: negative wire
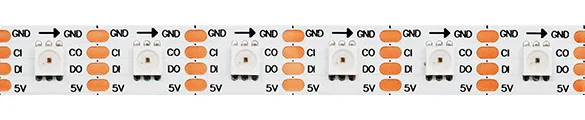
3.2 Dual Signal Programmable LED Strips
Dual Signal Programmable LED Strips add a clock function in addition to the data signal passing through, which allows you to set the time when the LEDs come on or go off.
- GND: negative wire
- CI/CO: clock wire
- DI/DO: digital signal wire
- 5V: positive wire
3.3 Breakpoint Programmable LED Strips
Breakpoint transmission is an upgraded version of the single-signal programmable LED strip, which is a 4-channel dual data line control circuit with one data line and one spare data line. When the single data line fails, the backup data line will automatically start to ensure that the signal is not interrupted.
- 12V: positive wire
- DI/DO: digital signal wire
- BI/BO: backup line
- GND: negative wire

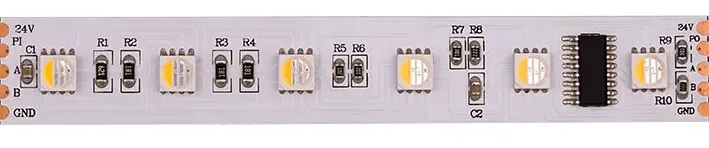
3.4 DMX512 LED Light Strip
The difference between the DMX512 LED Strip and other programmable LED Strip is that it is more intelligent; it can be connected to the DMX system to control various patterns such as running, flowing, chasing, animation, etc., with any combinations of patterns and displaying any colors.
If a pixel is damaged, it does not affect the signal transmission, and other pixels can be used normally.
- 24V: positive wire
- PI/PO: address programming
- A: digital line
- B: digital line
- GND: negative wire
If you find the above markings on your strip, it means that your strip is programmable and you can control your strip with different modes.
4. Why do I Need to Program My LED Strip Lights?
When you want to add some fun to your lighting, when you want a wide variety of cool effects, when you no longer want to deal with boring and monotonous lighting, and when you want to add your own creativity to your lighting projects, you need to program LED strips. Programmable LED light strips have hundreds of effects that can be used, and programming LED light strips allows you to decide which possibilities you want to implement. You can think of programming as customizing the way the LED strip works rather than letting it work arbitrarily.
Programming LED strips is done by adjusting the color, brightness, and pattern. Programming addressable LED strips allows you to create environments that reflect your mood, enhance your décor, or simply bring your imaginative concepts to life. Programmable LED strips are more than just lighting solutions; they are canvases waiting to be painted with light.
As you delve deeper into the realm of Programmable LED Strips programming, the potential of your space becomes more and more apparent. Programmable LED strips are more than just a choice of hues; they create an atmosphere that resonates with your personal or professional spirit.
5. Programming Tools
For the programming process and subsequent control of programmable LED strips, a variety of tools and materials are required. At the heart of the programming is the LED programming software and controller, which are the brains of the operation, allowing you to customize and program lighting effects. There are a variety of programmable softwares on the market; in this article, we mainly introduce two: Arduino and LedEdit.
5.1 Arduino
Arduino is an open-source electronics platform based on easy-to-use hardware and software. Arduino boards are able to read inputs – light on a sensor, a finger on a button, or a Twitter message – and turn it into an output – activating a motor, turning on an LED, publishing something online. You can tell your board what to do by sending a set of instructions to the microcontroller on the board. To do so you use the Arduino programming language (based on Wiring), and the Arduino Software (IDE), based on Processing.

Arduino is an open-source electronics platform based on easy-to-use hardware and software. The Arduino development board can read inputs (light from a sensor, a finger on a button, or a Twitter message) and convert them into outputs (start a motor, turn on an LED, publish content online). You can tell the board what to do by sending a set of instructions to the microcontroller on the board. To do this, you use the Arduino programming language (based on wiring) and the processing-based Arduino software (IDE).
Arduino is an open-source interface with a physical board that is controlled by software. It connects to a computer and allows you to manipulate the software to program LED strips. Essentially, the Arduino is used as a microcontroller. The code you enter on the computer is relayed to the Arduino’s physical board, which relays it as a data signal to the addressable LED strip.
5.2 LedEdit
LedEdit is the latest program editing software of Shenzhen Singba Light Technology Co., Ltd. with online upgrade function, compatible with Win7, Win8, Win10, and at the same time with the mainstream design software AutoCAD, CoreIDAW, and Flash for the perfect combination of LED lighting programming design provides a powerful convenience.
LedEdit software is usually used with K-1000C or K-8000C controllers, which can realize online programming or preset programming and then use the TF card to play the lighting program.
Download LedEdit-K Manual – 2021
6. How Do I Program an Addressable (Programmable) LED Strip?
You will need the following items for the programming process and subsequent control of the LED strip:
- Arduino interface or K-1000C/K-8000C controller
- a computer
- programmable LED strips
- Resistors (electrical term)
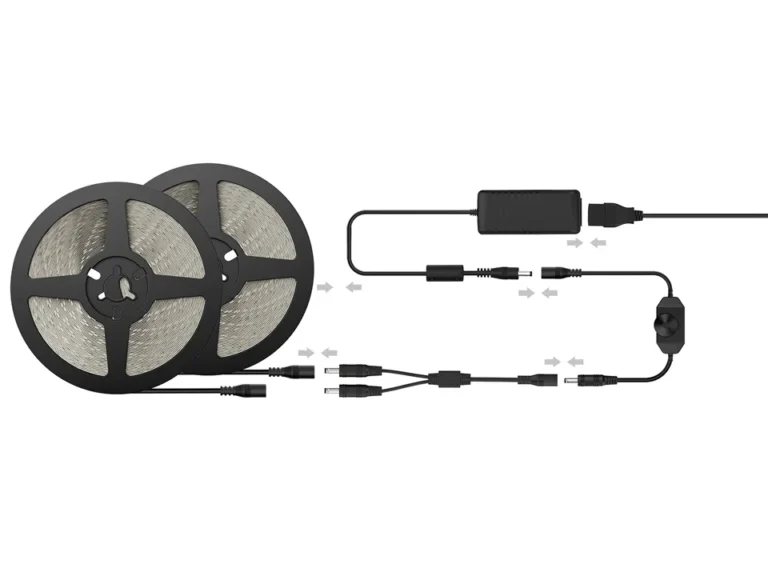
- If you want to operate long LED strips, you need the appropriate DC power supply (DC5V/12V/24V).
6.1 How to Program LED Strip Lights with Arduino?
Ultimate Guide to Programming LED Strips with Arduino

Selecting a Programmable LED Strip
There are many types of programmable LED strips, such as the WS2812B, APA102, and SK6812, each with its own unique features. When choosing, consider factors such as color accuracy, brightness, and individually addressable LEDs.
Choosing the Right Power Supply
Make sure your addressable LED strip gets enough power. Depending on the requirements of the LED strip, you may need an external power supply in addition to the one provided by the Arduino. Some LED strips can be powered by a DC 5V power supply, and some addressable LED strips require a DC 12V or DC 24V LED power supply. Again, please read the specifications of the LED strip before using it.
How Do I Connect the LED Strip to Arduino?
Connect the data input pins of the programmable LED strip to the digital pins on the Arduino, the ground pins to ground on the Arduino, and the power pins to an external power source, using jumpers to make these connections.
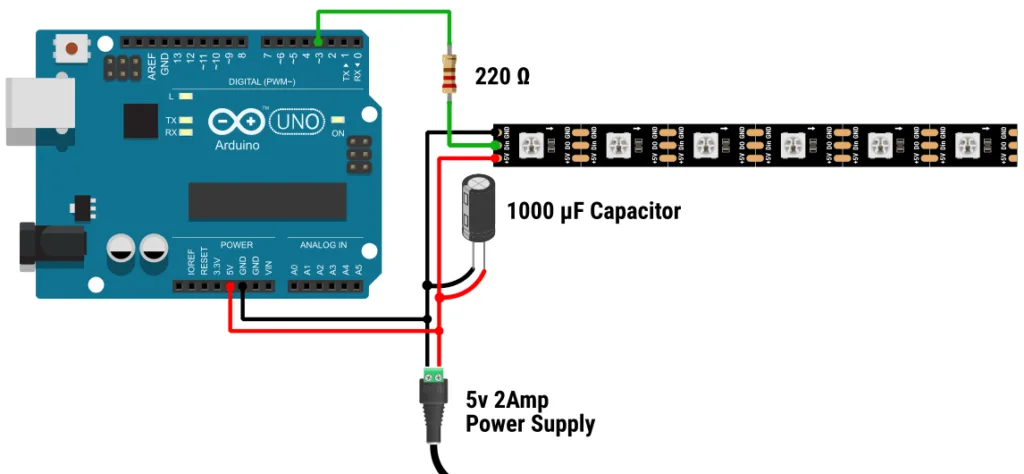
Special Note: You will need to check the LED strip and the Arduino board to identify the input and output pins. Typically, the data input pins, ground, and power pins are critical for connectivity.
The pinout of a programmable LED strip may vary depending on the specific type or model of LED strip. Be sure to refer to the datasheet or documentation provided by the LED strip manufacturer for your addressable LED strip for accurate information.
The following are common pin descriptions for programmable LED strips:
Power (V+): This is the power pin. It usually requires a positive voltage, typically DC 5 volts, 12 volts, and 24 volts. Connect this pin to the positive terminal of the power supply.
Ground (GND): This is the ground pin. Connect this pin to the ground (0V) of the power supply.
Data Input (DI): This is the input for the data signal. Connect this pin to the data output of the microcontroller or LED controller. For the WS2812B and similar types, this pin may be labeled “DIN” or “DI”.
Data Output (DO): This is the data signal output. If you are connecting multiple LED strips in series, you need to connect the DO of one strip to the DI of the next strip; for some LED strips, this may be labeled “DOUT” or “DO”.
Clock (CI or CLK): For LED strips that use a clock signal and a data signal (such as the APA102), there may be a clock input. Connect this pin to the clock output of the microcontroller or LED controller.
Clock Output (CO or CLK): Again, if you are connecting multiple APA102 LED strips in series, you will need to connect the CO of one strip to the CI of the next.
Backup Data Input (BI): This is the input for the backup data signal. Connect this pin to the backup data output of the microcontroller or LED controller. For the WS2815 and similar types, this pin may be labeled “BIN” or “BI”.
Backup Data Output (BO): This is the output for the backup data signal. If you are connecting multiple LED strips in series, you will need to connect BO from one strip to BI on the next strip; for some LED strips, this may be labeled “BOUT” or “BO”.
Programming Steps
Unlike writing software from scratch (which requires a lot of skills), there are libraries you can download. Once you have it installed, you can add some code to create your favorite effects. On your computer, add the downloaded library to the Arduino libraries folder. Open the library and use the following steps for initial setup:
1). Use the FastLED library. This allows the Arduino to understand the next few commands we are going to issue. The FastLED library knows how to convert our decimal integers into the binary format that the Arduino needs.
2). Enter the number of LEDs. We must tell the Arduino the number of programmable LEDs we intend to use.
3). Confirm the type of LED strip. We must inform the FastLED library of the type of addressable LED strip we are using. Since the FastLED library can operate a variety of LED fixtures, we must select the correct LED strip type, such as WS2812.
4). Specify the pinout. Tells the Arduino which PIN we are using; this is where we connect the cable to the Arduino. For example, it connects to pin 2, which may be located at position 3, 4, or 5 where your LED strip is plugged in.
5). Arrange the colors. This is telling FastLED that we are going to use green first, then red, and finally blue.
6). Name your code. This will be the same name you entered in step 2, and finally enter the number of LEDs again; this means specifying how many LEDs to relay the data signal to.
The Arduino “reads” and executes the code line by line, so it’s important to perform these steps in order. Once you have this initial setup, you can choose to copy and paste the code, or if you feel you can’t write it yourself, you can use some of the effects created through programming, including RGB chases, rainbows, or blue and orange flashes.
6.2 How to program LED strip lights with LedEdit?
How to Use LEDEdit 2021 Software

Select Programmable LED Strip
There are many types of programmable LED strips, such as SPI LED strips WS2813, UCS1903, etc., as well as DMX512 LED strips TM512AC, etc., each with its own unique features. When choosing, consider factors such as color, color accuracy, brightness, and individually addressable LEDs.
Choosing the Right Power Supply
Make sure your addressable LED strip gets enough power. To program with LedEdit and the K-1000C controller, you will need an external power supply. Some LED strips can be powered by a DC 5V power supply, and some addressable LED strips require a DC 12V or DC 24V LED power supply. Again, please read the specifications of the LED strip before using it.
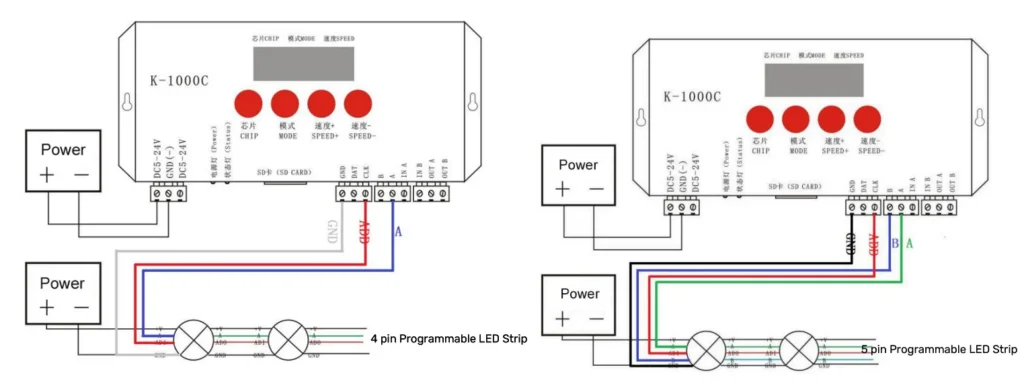
How Do I Connect the LED Strip to the K-1000C Controller?
3-pin (V+, D, GND), 4-pin (V+, D, B, GND), and 5-pin (V+, P, A, B, GND) are three common connections for programmable strips. The difference between them is the availability of a spare signal line and an in-line address line. The spare signal line maintains the stability of the entire LED lighting system. V+ and GND are the positive and negative power supply lines, D, A, and B are the data lines (see Common Pin Descriptions above for details), and P is the in-line address line.
The K-1000C is a popular controller for programming SPI and DMX lighting effects. Below is the wiring diagram for connecting the K-1000C DMX controller to 4-pin, and 5-pin programmable light strips:
Programming Steps
LedEdit is a popular software among programmers who program LED panels or pixel LED strips because it is powerful and easy to use. As you probably know, LED Edit and LED Edit-K are two different versions with different options and interfaces. The following programming steps use LED Edit-k as an example:
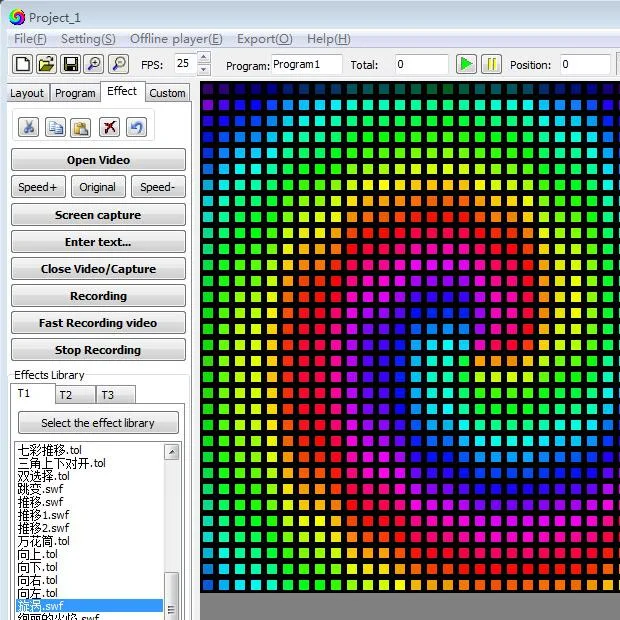
1). Create a new editing project. This will display the New Project window. Select the controller you want to use from the “Controller Type” list and enter the maximum number of LEDs to be used per port in the “Maximum number of lights per port” field when creating the LED layout.
2). Set LED layout. LED layout is the representation of the physical layout of LEDs. There are two ways of LED layout: manual layout and automatic layout. For shaped and simple fixture layout, manual layout can be used; automatic layout is usually used for editing test programs or when the actual fixture is installed in a regular layout. Note: Please make sure your physical LED connection is the same as the connection shown in the layout.
3). Record video or animation. To program the Pixel LED Strip by recording an animation or video, you can either click on the “Open Video” button and select a video or animation from your computer, or you can select an animation from the effects library. With the animation or video selected and the video playing in the background, it is now time to record it. Once you have recorded the video or animation, use the Play button to play the animation to see if it is the result you want. If not, continue editing the video. If it is, it’s ready to export.
4). Exporting the project. In order to export the programmed lighting project correctly, please select “Generate and Export LED/Bin File,” which will open the Export Settings window, then select the LED Driver Chip from the Chip Selection List, and finally, in the Browse for Folder window, select a location to save your.led file. Finally, in the “Browse for Folder” window, select a location to save your.led file.
5). Play the effect file. Copy the saved.led file or.bin file to the SD card, then insert the SD card into the K-1000C controller; the controller will be powered on normally to play the programmed effect file.
Write at the End
At first glance, programming a programmable LED strip light may seem extremely complex and impossible for the average user. However, as you have learned from this guide, anyone can do it. As you learn about the various connections and the various IC models and properties of programmable strips, and as you practice and learn from the coding of other users, you will have a much stronger grasp on how to utilize them. Finally, remember to always follow your preferred safety precautions and connection recommendations. We are SignliteLED, an LED strip manufacturer from China.
Related Posts