In modern kitchens, lighting isn’t just about illuminating the space; it also improves functionality, enhances aesthetics, and can even set the mood for the entire room. Nowadays, the use of LED strips in cabinet lighting, in particular, has become a very popular option. LED strips are not only energy efficient, but they are also deeply customizable, offering a simple and stylish way to light up your kitchen. In this guide, we’ll discuss various aspects of kitchen cabinet lighting, from why you should consider it to how to choose and install LED strip lights.
What is Kitchen Cabinet Lighting?

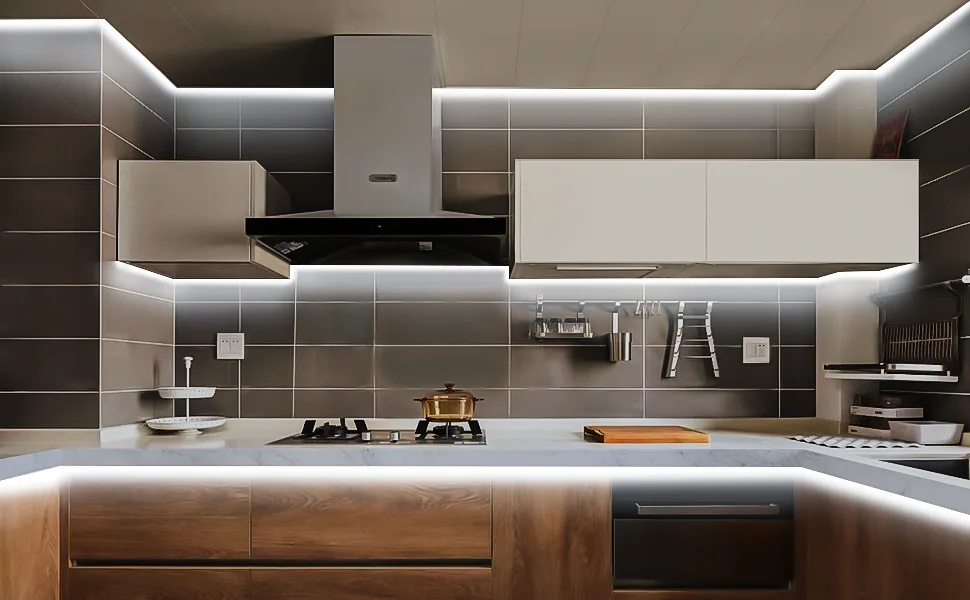
Kitchen cabinet lighting is any lighting system that is installed under, in, or around kitchen cabinets. This type of lighting can be used for both functional and decorative purposes and can illuminate countertops and cooking areas while enhancing the visual appeal of the kitchen. Cabinet lighting is particularly helpful in creating multiple layers of light in the kitchen, supplementing top lighting, and reducing shadows on worktops.
Types of Cabinet Lighting:
1. Under-cabinet lighting: This is the most common type and is installed at the bottom of the cabinet to illuminate the countertop below.
2. In-cabinet lighting: installed inside the cabinet, usually used to illuminate shelves in cabinets with glass doors.
3. Above-Cabinet Lighting: Installed above the cabinet, usually used for decorative purposes, casting a soft light to the ceiling.
Each type of lighting has a different purpose, but they all help create a well-lit, functional kitchen environment.
Why Use Cabinet Lighting?
Under cabinet lighting is no longer a luxury but an essential element of modern kitchen design. Under cabinet lighting can bring many benefits to your space, and great lighting can make a big difference.
1. Improve visibility and safety: With so many sharp tools and hot appliances in the kitchen, good lighting is crucial for safety. Cabinet lighting can eliminate shadows on your countertops so you can see more clearly when cooking and preparing food.
2. Enhance aesthetics: It can highlight beautiful features of your kitchen, such as backsplashes and countertops, and enhance the overall look of your cabinets.
3. Energy efficient: LED strips, in particular, are more energy efficient than traditional lighting options such as incandescent or fluorescent. LED lights use very little power and have a long lifespan, which means fewer replacements and lower electric bills.
4. Task Lighting: Detailed operations in the kitchen (such as chopping vegetables, reading recipes, or using small appliances) require centralized task lighting. Cabinet lighting provides this centralized light source.
5. Ambient and mood lighting: LED strips can also be used as ambient lighting, especially if they are dimmable, so you can adjust the brightness as needed—brighter for cooking, softer for eating, or relaxing.
What Cabinet Lighting Types Are Available?
Of the several common cabinet lighting types, LED strips are the most popular due to their versatility and popularity. Here are the main types of cabinet lighting:
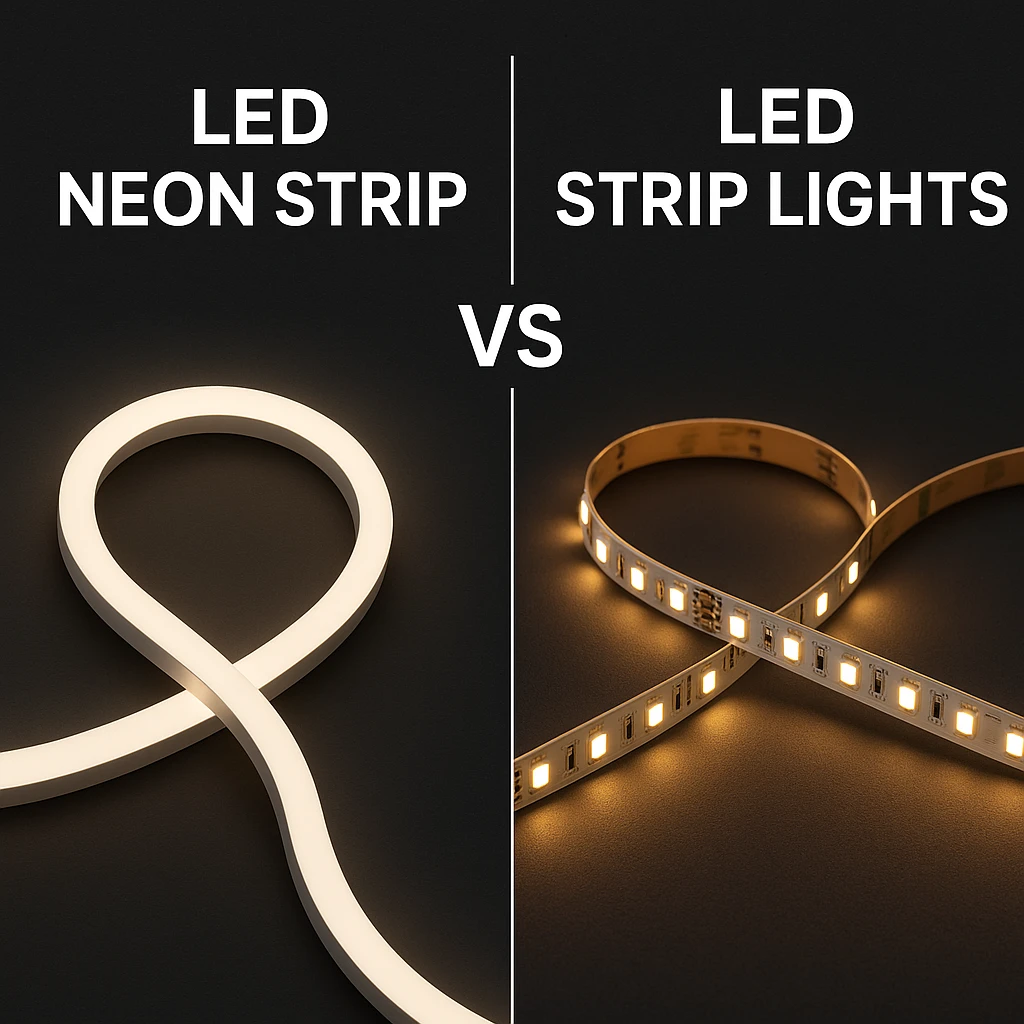
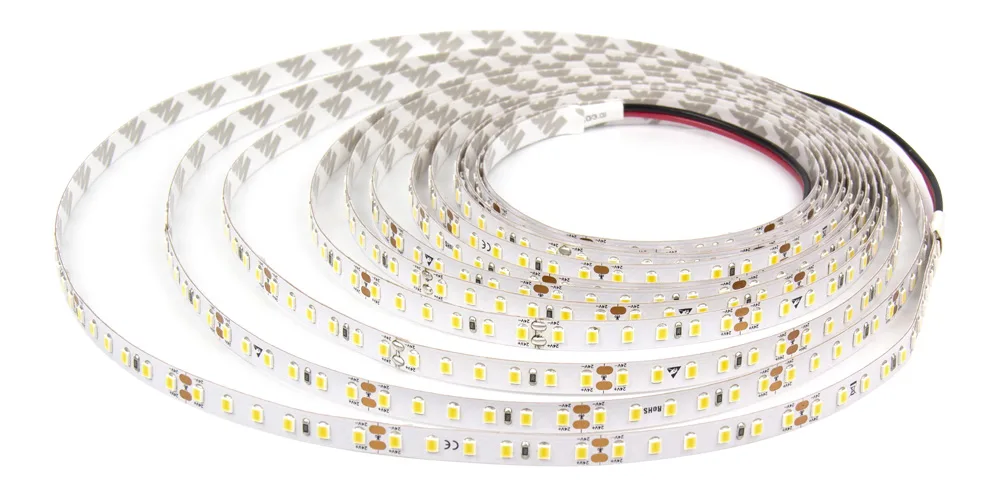
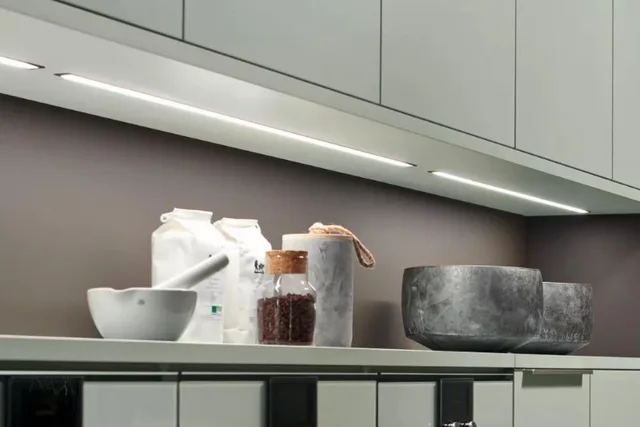
LED Strips
LED strips are a great alternative to liner lights. They come in different widths and diode sizes, which you should consider when deciding the right place to install them. For example, LED strips with larger diodes can cover more space, so you can place them in the center to illuminate the entire lower portion of the cabinet. Similarly, if you want to focus more on accent lighting, it’s okay to use thinner LED strips. In this case, install them at the end or back of the cabinets for a hidden accent lighting effect. However, consider the density of the LED strip when selecting fixtures for your cabinets. Low-density LED strips can cause a hot spot effect, which may not look good. Additionally, if you set them too close to the front, they may create bright spots on your counters. Therefore, before placing them, it’s best to check by moving the strip from the back to the front to find the best position.
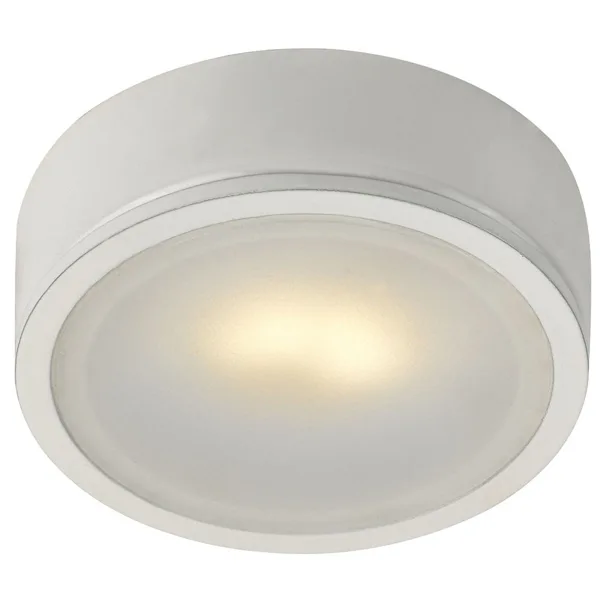
Round Lights (Puck Lights)
The main issue that arises when using puck lights for under-cabinet lighting is determining the distance between the lights. In this case, you need to consider the length of the under-cabinet cavity, the beam angle of the lights, and their brightness. The number of puck lights required and their distance depends on the beam angle of the lamps. Puck lights usually have a beam angle of between 20 and 120 degrees. You can find the beam angle of the puck lights on the package. The general rule of thumb here is to place the 90-degree puck lights about 20 inches apart so that the beams overlap by about 50%. Also, the under-cabinet cavity is an important consideration.
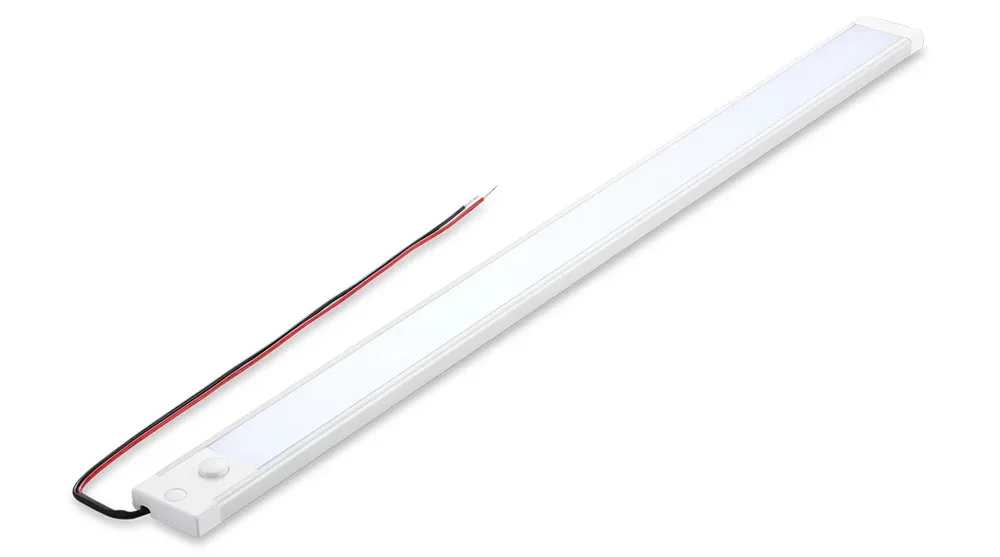
Linear Light Bars
Linear lights, also known as strip and bar lights, are an excellent choice for under-cabinet lighting. The best part is placing the bar lights on the front edge of the cabinets, which hides the wires and keeps the lights themselves from being seen. With these fixtures, you can bring even lighting to the countertops and backsplashes of your cabinets. For best results, you should focus on matching the length of the stick lights to the length of their counterparts. Stick lights are usually sold in regular length increments. For example, you’ll find them in 8 inches, 16 inches, 24 inches, or 32 inches. Now, if your cabinet’s lower cavity is 18 inches, choose a 16 inch stick light over an 8 inch one. That said, the rule is to match the length of the cavity to the length of the fixture whenever possible.
Installation Positions for Cabinet Lighting
One of the advantages of LED strip lighting is its variety of mounting locations. Here are three locations you can choose from that will achieve the best results; read the sections below to find out which one you prefer:
Cabinet fronts: best for task lighting
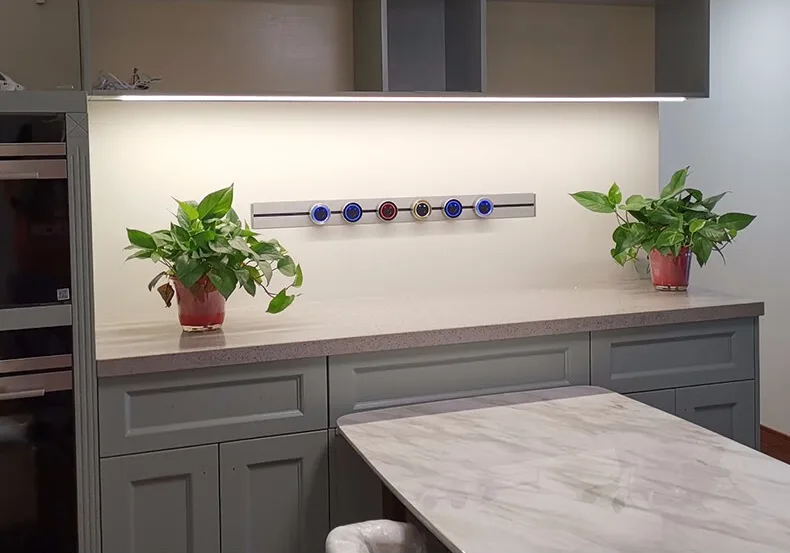
Placing LED lights on the front of cabinets is best for task lighting. This way, you can ensure that more light hits the front of the counter and less hits the wall behind the counter. As a result, it will provide adequate lighting when you are chopping vegetables or performing other food preparation tasks on the counter. LED strip and bar/strip lights are great for front cabinet lighting. You can install them along the inside border underneath the cabinets. However, any bars on the front of the cabinets may hide the fixtures, which can lead to shadow issues. In this case, mounting the fixture 2-3 inches back is sufficient. However, if the railing is designed in such a way that you can easily insert an LED strip on its inside, don’t miss the opportunity to take advantage of it. Such an under-cabinet light installation will hide the fixture and deliver elegant accent lighting.
Back of cabinet: perfect for accent lighting
If you install LED lights behind your cabinets, the wall behind your kitchen counter will be bright. But the front of the counter will not be as well lit. If you need good light for cooking and other kitchen activities, don’t put the lights behind the cabinets. Instead, you can place them closer to the front. However, when your kitchen has enough ambient lighting and you want to focus more on accent lighting, the back of the cabinets is your preferred location. For accent lighting, you can opt for LED strips in warm colors to bring a cozy ambiance to your space. In addition, you can also experiment with colored LED strips such as lime green, orange, pink, blue, or a color that matches your interior decor.
Middle of the cabinet: Bringing balance to lighting
Placing LED lights in the middle of your cabinets allows the light to be evenly distributed between the backsplash and the front of the counter. It also balances task lighting and ambient lighting. If you’re not sure what to do, placing LED lights in the center may be a friendly compromise solution. When you place the light in the center of the cabinet, you still have enough light on the front of your countertop. Therefore, it helps with accent lighting and task lighting. However, consider the size and brightness of the fixture you are installing. Make sure that the fixture you place in the center of your cabinets is bright enough to evenly illuminate the entire space below.
However, if your countertops are made of shiny materials such as marble or tile, avoid using fixtures that are too bright under the cabinets. This can lead to replication issues. In this case, if you’re using a puck light, use a smaller light with a wider beam angle; this will scatter the light without causing serious reflection problems. Similarly, I recommend that you choose an LED strip with a medium lumen rating and a wider strip length. As a result, you won’t experience reflection problems but will have enough light to get the job done. In this case, the size of the LED chip is also a key factor in choosing the ideal LED strip, with larger LED strips providing more illumination.
How to Properly Place Cabinet Lighting
When installing cabinet lighting, placement of the lights is crucial. Here are some tips to ensure the best possible lighting:
Available Space
First, find a suitable space, but you must avoid the back wall when placing the lights. However, you may consider creating ambient placement; it will only result in loss of light. Additionally, it can be the cause of shadows, especially if your backsplash has a textured surface. In addition, many lights have wide beams that spread out. If you lean it against the back wall, you will lose focused light suitable for working under cabinets. Sometimes lights have a 45-degree angle, and it’s OK to mount them on the back of upper cabinets to allow them to shine outward.
Distance from Countertop
You must consider the distance between the lower cabinet area and the counter surface to ensure adequate brightness. If you use a low-lumen bulb that does not cover that distance, you will not get proper lighting. For example, if you slide your hand from the back to the front of a cabinet on a counter, you will notice the light going down and then up. You obviously want the brightest possible light on most counters, right? However, most kitchen cabinets have a distance of about 18 to 24 inches from the counter to the bottom of the upper cabinets. As a result, regular LED lights may not provide enough brightness in that space. For example, if you use a 3-watt LED puck light with 200 lumens and place it 36 inches from the surface, you’ll only get about 10 footcandles of light.
Fixture Size
Can a larger fixture light up a large space? No. The amount of area a fixture can cover depends on the beam angle of the fixture. It can look strange to install bulky fixtures under cabinets. In this case, choose a smaller fixture with a larger beam angle. This will illuminate a large space while maintaining the minimal appearance of the fixture. However, when installing small recessed fixtures, the distance between the fixtures must be reduced to ensure adequate light. If the distance increases, it is possible to install larger fixtures. On the other hand, when using LED strips, width must be considered; LED strips are available in a variety of widths. Wider strips provide more prominent lighting.
Voltage Ratings and Power Supplies
A common question when installing light fixtures under cabinets is how to power the lights. Don’t worry; if you don’t have an available power source near your cabinets, you can opt for a battery-powered light. USB LED light strips can also save you the hassle of plugging them in.
However, whether you choose a plug-in light or a battery-powered light, matching its voltage to the power supply is essential. For example, for an indoor cabinet, you can choose 12V, but for an outdoor cabinet, choose 24V. Using a 12V LED strip on a 24V power supply can overload the fixture and damage it.
Avoid Bounce Problems
Don’t focus on making your kitchen backsplash stand out. Instead, use lights to illuminate the space where you’re working on the countertop. In some older kitchens with large halogen lights, you’ll see them mounted behind cabinets. Certain types of lighting, such as LED strip lighting, can make your space look beautiful by hiding things like wires and boxes. However, it has its drawbacks: it doesn’t spread the light wherever you want it to go. With newer, smaller, more powerful LED lights, you can put them in the right places. This is important because if your kitchen walls have a lot of texture or the color of the tiles doesn’t match the color of the lights, your kitchen may feel less appealing.
Hot Spot Reflections
Have you ever noticed the hotspot effect in LED light strips? It doesn’t seem to be a problem, but the visual effect is not aesthetically pleasing. This problem occurs frequently when you choose low-density LED strip lights. In these fixtures, the distance between the LED chips is large. As a result, when they are lit, the light from the individual chips creates a dotted effect known as a hot spot. Since countertops are mostly made of shiny materials like marble or tile, these hot spots will reflect off these surfaces, causing glare problems. In addition, you won’t get even lighting. But how do you solve this problem? The best solution is to use high-density LED strips or COB LED strips. But if you already have low-density strips, don’t worry; you can eliminate the hot spot reflection problem by using a diffuser. It can be a clear or frosted diffuser—choose what you think is best. Installing LED strips with diffusers will result in even lighting; therefore, you no longer have to deal with hotspot reflection issues.
Cabinet Cabinet Placement
When choosing lighting for the under-cabinet area, consider the location of the cabinet. If the cabinet is in close contact with water or moisture, you’ll need to choose a fixture with a higher IP rating. For example, purchase bathroom cabinet lights with at least an IP44 rating. However, these ratings vary depending on the area of the bathroom. Similarly, if you want to illuminate closet cabinets, you can use IP20 lights with a lower IP rating. Cabinets in these areas don’t come into contact with water, so they don’t need waterproof protection. However, if you prefer outdoor cabinet lighting, choose a higher IP rating that can withstand rain, storms, or other adverse conditions.
How to Choose the Right LED Strip for Cabinet Lighting
Choosing the right LED strip is critical to achieving the desired functionality and aesthetics. There are a variety of factors to consider when choosing the best LED strip for your project. Before proceeding, consider the following questions as they relate to your space.
- What materials are your cabinets made of?
- How deep are your cabinets?
- How far are they from the counter surface?
- What color are your cabinets, counters, floors, walls, or backsplash?
- What is the purpose of the lighting—is it the primary source of illumination or do you want to create a special atmosphere?
- Do you want static white output or color-changing or dynamic adjustable white output?
1. Brightness (lumens):
Brightness is measured in lumens, so the higher the lumen output, the brighter the light. Under cabinet lighting can be categorized into three main types of lighting depending on what you are trying to achieve. Lumen needs may vary from project to project depending on the size of the cabinets and the height from the counter to where the lights are installed.
Primary Lighting (500 – 1,000 lumens/ft.): When you are using under-cabinet lighting as the primary source of light in a room, choose a medium to high output brightness light bar. A strip of this brightness should illuminate the entire kitchen at night and be sufficient for most kitchen functions.
Task/Accent Lighting (200 – 500 lumens/ft): choose a medium brightness output for both task lighting and aesthetic purposes. You can use the lighting in a certain way to draw attention to specific areas, such as highlighting ceiling trim.
Mood/Low Accent Lighting (80-200 lumens/ft): if you prefer soft lighting to cover the entire space, choose a strip with a lower output. This is common when you use other types of overhead lighting as the main lighting in your kitchen and want a soft light underneath cabinets and counters. In the evening, turn off the main lights and use under counter lights to create a nice post dinner relaxation and night light.
2. Color Temperature:
Color temperature is measured in Kelvin (K) and determines whether the light is warm or cool. Warmer color temperatures (2700K-3000K) create a warm, homey atmosphere, while cooler color temperatures (4000K-5000K) provide a more modern, clean look. Which color temperature you choose depends largely on the style of your kitchen and your personal preferences.
In order to choose the best color for under cabinet lighting, consider the following questions:
Is there other lighting in the room? If so, you may need to match the color temperature of that lighting.
What kind of atmosphere do you want to create? Warm color temperatures help you relax, while cooler ones stimulate attention and awareness.
What is your decorating style? Choosing a color temperature and interior design interact with each other. If your style is more modern, choose cooler color temperatures. For vintage style decor, warmer color temperatures work better.
3. Color Rendering Index (CRI):
CRI refers to how accurately a light displays color compared to natural light. For kitchen lighting, it is recommended to choose strips with a CRI of 80 or higher to ensure that the colors of food, utensils and decorative items appear true to life.
4. Length and Cutting:
The LED strip you choose should be cut to fit the size of your cabinets. Most LED strips have cut points every few inches for easy length adjustment.
5. Solderless Connectors and Wires:
The best way to install under-cabinet lighting involves some simple handwork. While soldering is the best way to create a lasting connection, using solderless connectors to connect the LED strip lights to the power source is an easier and faster method.
6. Waterproof:
If the strip is installed near a water source, it’s important to choose a waterproof LED strip. Waterproof strips usually have an extra protective coating that prevents water vapor and moisture from eating away at the fixture.
7. Power Supply and Dimming Capabilities:
Make sure the power adapter of the LED strip is compatible with your power supply. Additionally, if you want to control the intensity of the light, choosing an LED strip with a dimming feature is a good option.
All of our LED strips are available in 12VDC and 24VDC input versions, with 24V being the most popular in most LED cabinet lighting applications. 24V versions allow you to run more wiring if necessary, such as hiding the power supply under the sink or in the basement, while the 12V versions have a shorter wiring section.
8. Mounting and Extruded Aluminum Profiles:
All of our LED strips come with a 3M adhesive backing, which makes them very easy to install. 3M adhesive sticks to most non-porous and flat surfaces.
LED strips are often paired with aluminum extrusions for aesthetics and practicality. The primary benefits of using LED aluminum extrusions in under-cabinet lighting include preventing speckling, changing the angle of light, and providing a more refined, professional touch to the strip. A second but important benefit is aluminum’s ability to act as a heat sink for LEDs, allowing them to run cooler and extend their life.
How to Install LED Strip Lights for Cabinet Lighting
Once you have chosen the right LED strip lights, the next step is to install them. Below is a detailed installation guide:
Step 1: Measuring and Planning
First, measure the length and width of your cabinets to determine how much LED strip lighting you will need. Remember to plan the layout ahead of time by considering any turns or bends that need to be made. If you’re focusing on task lighting, choose the front of the cabinets to install the lights. For accent lighting, the back of the cabinets work well. However, if you can’t decide where to place them, the center part of the cabinet is a safe bet. Once you’ve decided on a location, it’s time to take measurements. Use a tape measure to note down the length of the cavity. This measurement will help you purchase the LED strips according to the length requirements.
Step 2: Prepare Materials
Now that you know how many LED strips you will need, purchase them from a reliable source. You will also need the following materials:
- power adapter (plugged in or hardwired)
- connecting cables and LED connectors
- Scissors
- Tape measure
- Wire clips (for organizing wires)
Step 3: Clean Surfaces
Kitchen area cabinets often accumulate dirt and grease. It is a mistake to place your LED strips directly on such a dirty surface because adhesives do not stick well. As a result, your LED strips may come loose and fall off. To avoid this, it is important to clean the surface. You can use alcohol or any damp cloth to clean the space. However, before installing the LED strip, make sure that the surface underneath the cabinet is completely dry. If the surface remains wet, the adhesive will not stick to it.
Step 4: Cut the LED Strip (if necessary)
If the length of the strip exceeds the size of the cabinet, you can cut it to fit. Most LED strips have marked cutting points; use sharp scissors to cut along the marks to ensure you don’t damage the strip.
Step 5: Install the LED Strip
Remove the adhesive backing from the LED strip and attach it securely to the bottom of the cabinet according to the planned layout. If using mounting clips, secure the clips in place first and then embed the light strip in the clips.
Step 6: Connecting the LED Power Supply
Connect the light strip to the LED power adapter. If using a plug-in adapter, plug it into a nearby outlet. If you choose a hardwired connection, follow the manufacturer’s instructions, and it is recommended that you consult a professional electrician if you are unfamiliar with working with electrical cords.
Step 7: Hide the Cord
To keep things neat and tidy, use cord clips or adhesive cable holders to make sure cords are not exposed by running them along the edges of cabinets or hiding them behind equipment.
Step 8: Test the Lights
Once the installation is complete, it’s time to power up the unit. Connect the LED driver to the LED strip and then to the power supply. Check the positive (+) and negative (-) markings on the power supply and connect them to the LED strip accordingly. Turn it on, and the light will come on. However, if it is a battery-powered LED strip, then simply flip the switch. If the strip is dimmable, test the dimmer to adjust to the proper brightness.
Step 9: Final Adjustments
If necessary, make some final adjustments to ensure that the lights are positioned correctly and are evenly lit with no dark areas or gaps.
Conclusion
Under cabinet LED strip lighting is a simple and effective way to not only improve the functionality of your kitchen but also add to its aesthetic appeal. Whether it’s for better lighting for cooking tasks or to enhance the overall ambiance of your kitchen, LED strip lighting is a flexible, energy-efficient solution. With proper planning, selection of the right materials, and installation process, you can easily make your kitchen a more welcoming, functional, and stylish space.
LED strips are the most popular variant of under-cabinet lighting. They do not get hot very quickly. Therefore, there is no need to worry about burning your wooden cabinets due to overheating issues. Additionally, dimmable white LED strips are perfect for cabinets because they have an adjustable CCT level. To choose the best LED strips for your cabinets, place your order at SignliteLED today. We have monochromatic, RGB, dimmable white, and dim warm LED lights that fit perfectly under your cabinets. Additionally, we offer customization to meet your needs. So, contact us as soon as possible!