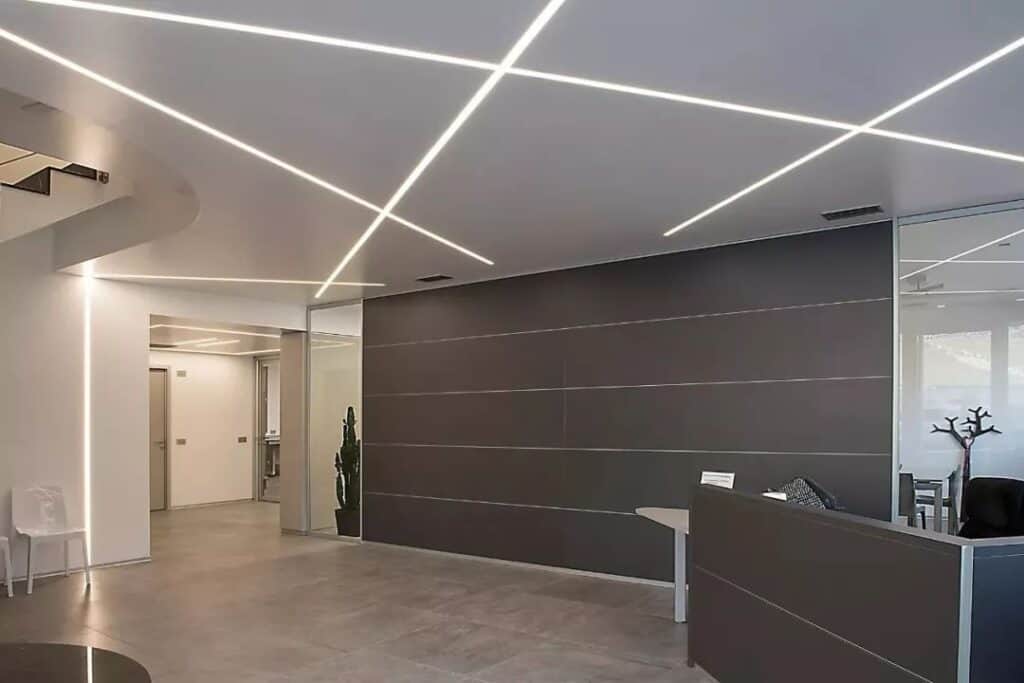
As ceilings get more and more varied in style, so are the kinds of lamps that are installed within our homes. For instance, the lamps in the old houses were essentially chandeliers or ceiling lights. However, if you look at it now, you’ll see that light strips, spotlights, and downlights are installed. Specifically, our home’s ceiling grooves have made light strips necessary on a large scale. On the other hand, an improperly placed light strip increases the likelihood of failure or flickering issues. Thus, everyone should become proficient in the particular installation techniques for light strips fitted during house décor. SignliteLED will provide answers to your inquiries on how to install light strips in this article.
(1): The light strip’s connection
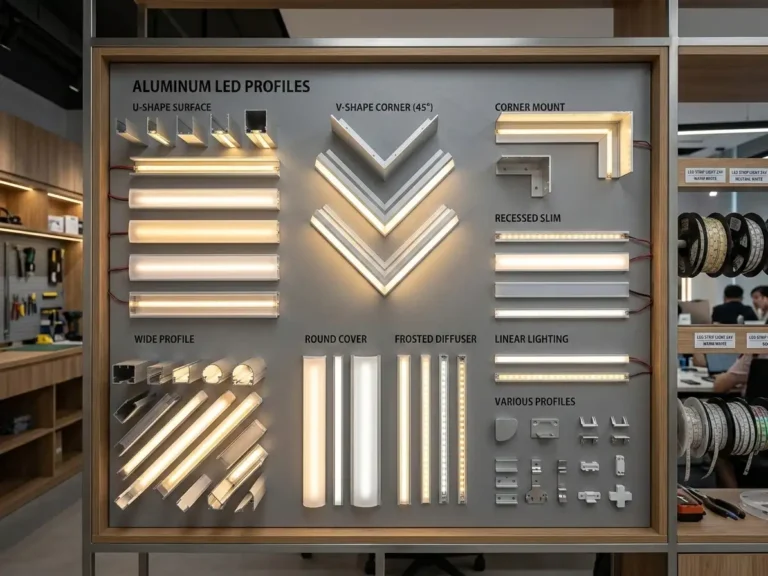
Regarding the light strip, I’m not sure if you’ve noticed it. Light strips are available in different sizes based on our needs. The length of a set of light strips can reach tens of meters, but the shorter ones are only one or two meters, so the light strips that are installed in our house must first identify how each individual light strip is connected. Our ceiling’s light strip installation consists essentially of rows of light strips. As a result, to find the light strip’s connection, take the actions listed below.
1. Ascertain the required length of the light strip installation, and then select an integer to intercept based on the installation length. Each unit is approximately 1 meter long, similar to our more typical light strips, thus we need to make sure that it won’t be destroyed during the intercept. In order to prevent interference with the circuit, this needs to be cut from the notch. It’s possible that some of the lamp beads won’t light up if we intercept randomly. As a result, measuring the length comes first, followed by intercepting.
2. Corrected. The installation process is rather easy because our light strips are all mounted in our ceiling grooves and do not take waterproofing into account. For instance, the majority of our widely used LED light strips feature self-stick tapes attached to the back. We just paste it straight into the groove using its self-adhesive tape.
3. The light strip’s connector. It’s time to attach the light strip after we use self-adhesive glue to paste it into the ceiling’s groove. Should we be concerned about the light strip’s movement, we can use double-sided tape to secure it. Lastly, to mend it, flatten it with your hands. We now have to attach the light strip. We simply separate these components since LED light strips are often made up of three LEDs connected in series or parallel. If a joint is present in the middle, a unique soldering technique must be used to connect it. However, attempt to avert this circumstance and make use of the entire light belt installation part.
(2): Electrical connection
1. Installing the power supply is the second stage in installing light strips at home. The power source for our light strips is often stored on the top plate, and we operate it via the interior light switch. Connecting the light strips’ power supply is the second stage in this process. In particular, the steps listed below can be used to finish it.
2.Since standard LED light strips have a voltage of about 12V, a specialized power source is needed. Currently, the power and length of our light strip are taken into consideration when choosing the power supply size. Currently, power supplies can be used with light strips, which are essentially loop light strips. Of course, a standard power source can also be used for control. As the general power supply at this time, we must buy a switching power supply with a pretty large power output and connect all of the LED lights in parallel with the input power. The ability to be centralized is by far this’s greatest benefit. One way is to turn on and off a single circuit. Right now, we make decisions based on the installed light belt.
(3): Linking the controller
1. Similar to regular LED light strips, these typically have several controllers installed when they are first placed. You may achieve a variety of color alteration effects using this controller. Each controller has a distinct control distance for various light strips. Similar to our most popular basic controller, the control distance is typically 10–15 meters, while the remote controller’s range is roughly 15–20 meters, with the longest being up to 30 meters. There should also be a rational decision made for light strip controllers used in households.
2.Choose the recommendation. Generally speaking, the length of the light strips is what we need to consider when installing them for house décor. Actually, it is usually 10–15 meters for a family, and the longest one is 15–20 meters, which is not too lengthy. Simply purchase the standard matching controller. To break up a really lengthy light strip, however, you will need to employ a power amplifier.
(4): Things that require attention
1. We need to be aware of a few issues with the light strips that are installed in our homes. Although the light strip is very easy to install and fix, if the installation is not done according to the guidelines, it could result in issues with the lighting of the entire strip, particularly because the heat from the LED light strip will eventually burn a hole in our ceiling. Thus, these are the items that require our attention.
2.Reasonably controlling the LED strip’s connecting distance is important. For instance, the most popular LED light strip from the 3528 series has a connecting distance of no more than 20 meters. The longest connecting distance for an LED light strip made in the 5050 series cannot be more than 15 meters. As a result, we should appropriately restrict the length of the light strip we place in our home based on the type of light strip we select.
3. Every light strip needs to have a specific plug. For instance, transformers are a feature of plugs. To make it more difficult to create a short circuit, we can take off the clear plastic cover during installation, connect it, and then cover it afterwards. Everyone needs to be aware that they shouldn’t be connected to a cover directly since this could result in a short circuit.
4. Make careful you pay attention to the cut mark when cutting the light strip. You can check, for instance, if any qualified light strips have cut markings. Only the sign may be cut while cutting the light strip, as incorrect or incomplete cutting could prevent the genuine light strip within a meter from lighting up. Thus, make sure you can clearly see the logo before cutting. Additionally, consider whether the logo is centered.
It’s actually very easy to install the light strip using this way. It can be fastened straight into the ceiling groove, just like our home dcor. Here, the connection of the light strip is the center of attention for everyone. Due to the fact that many families will experience this issue, where the light strip eventually burns out after flashing for a while. Furthermore, some households discovered that our suspended ceilings progressively became yellow. Actually, the incorrect choice and placement of light strips was the root cause of problems. As a result, SignliteLED concentrates on outlining the procedures for installing the light strip as well as the issues that require consideration in this post. It’s easy to comprehend before you install the light strip.
Related Posts