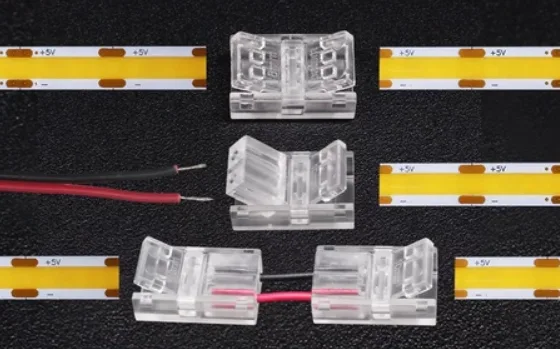
أضواء شريطية LED مناسبة لمجموعة واسعة من سيناريوهات التطبيق، والتي يمكن استخدامها للإضاءة المساعدة، والإضاءة الزخرفية، وإضاءة المهام، وإضاءة نمو النباتات، وإضاءة LED ذات الطول الموجي الخاص، وما إلى ذلك. توفر لنا مصابيح الشريط (ليد) الشريطية أمانًا متأصلًا ونعومة وقابلية للقطع، مما يوفر لنا راحة كبيرة في استخدام مصابيح الشريط (ليد) والاستمتاع بها بشكل أفضل.
هناك أنواع مختلفة من شرائط الإضاءة LED، مثل شرائط الإضاءة LED المقاومة للماء، وشرائط الإضاءة LED الخارجية، وشرائط الإضاءة LED لغرفة النوم، وشرائط الإضاءة LED للغرفة. بغض النظر عن عدد الأنواع والمسميات التي تتطور، فكلها تستند إلى 6 أنواع أساسية من شرائط LED أحادية اللون، والأبيض القابل للتعتيم، و RGB، و RGBW، و RGBCCT، وشريط LED القابل للعنونة. توفر هذه المقالة دليلاً تفصيليًا ومخططات الأسلاك حول توصيل هذه الأنواع الستة من شرائط LED.
من أجل فهم أفضل لكيفية توصيلها بالأسلاك، يجب أن نفهم أولاً العوامل الرئيسية الثلاثة المرتبطة بشرائط LED، وهي انخفاض الجهد، والتوصيلات المتسلسلة والمتوازية ومضخمات LED.
فهم ما هو انخفاض الجهد الكهربائي
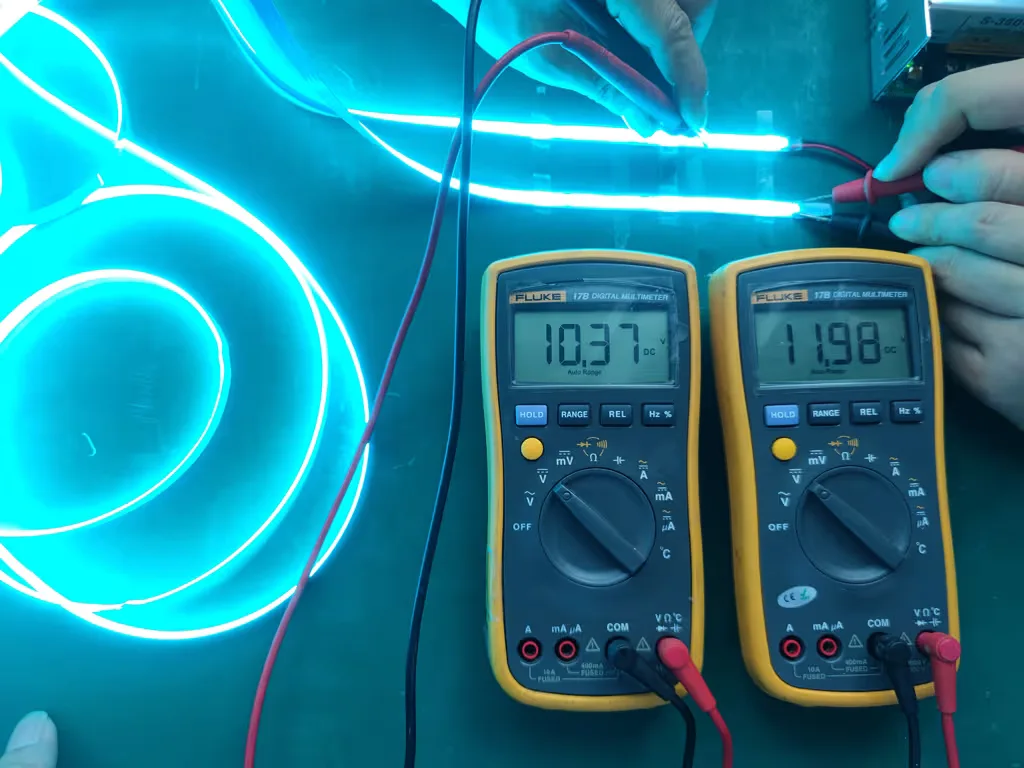
فولتاجهـ دالمرجع هي ظاهرة طبيعية في أنظمة إضاءة LED ذات الجهد المنخفض. ينخفض الجهد الكهربي تدريجيًا على طول سلك إمداد الطاقة لمصباح LED ويختلف حسب نوع وحجم تركيب مصباح LED. ويرتبط ذلك بطول السلك وسُمك السلك وكمية الطاقة أو القوة الكهربائية الكلية التي يستخدمها مصباح (ليد).
لا يصبح انخفاض الجهد مزعجًا إلا عندما تلاحظ أن إحدى مناطق شريط LED تختلف اختلافًا كبيرًا عن الأخرى. يكون لون وسطوع مصابيح LED في أفضل حالاته عندما يكون خط الإمداد من مصدر الطاقة إلى شريط أو مصفوفة LED أقرب ما يمكن إلى جهد 12 فولت أو 24 فولت لشريط LED. إذا كان شريط LED طويلًا، فسيواجه الشريط أيضًا انخفاضًا في الجهد.
إذا كان يبدو أن انخفاض الجهد يمثل مشكلة، فقم بتقصير أسلاك إمداد الطاقة أو قم بالتبديل إلى سلك أكثر سمكًا (رقم AWG أقل)، أو قم بتقصير طول شريط LED. يمكنك أيضًا التفكير في استخدام مزود طاقة إضافي بجهد 24 فولت أو 12 فولت لإنشاء تركيب ثانٍ منفصل.
سيساعدك فهم انخفاض الجهد على تصميم دائرة تعمل بكفاءة. يمكنك أيضًا استخدام هذه الأداة لحساب انخفاض الجهد عبر الموصلات: حاسبة انخفاض الجهد الكهربائي.
فهم ما هي التوصيلات المتسلسلة والتوصيلات المتوازية
اتصالات السلسلة
يتم إجراء التوصيلات المتسلسلة عن طريق توصيل الطرف الموجب (+) لشريط LED الأول بالطرف السالب (-) لشريط LED الثاني. كرر هذا النمط مع شرائط LED الأخرى، من الطرف السالب (-) للشريط الثاني إلى الطرف الموجب (+) للشريط الثالث، وهكذا. في نفس الوقت، قم بتوصيل الطرف السالب (-) لشريط LED الأول بالطرف السالب (+) للشريط الثاني، ثم قم بتوصيل الطرف السالب (-) للشريط الثاني بالطرف الموجب (+) للشريط الثالث، وهكذا.

في حالة التوصيل المتسلسل لشرائط LED، فإن تيار السلسلة يساوي تيار أول شريط LED، والجهد هو مجموع جهد جميع شرائط LED (جهد أول شريط LED مضروبًا في عدد شرائط LED).
تُعد الأسلاك المتسلسلة طريقة سريعة وسهلة لأنها لا تتطلب منك إنشاء وصلة خط طاقة منفصل آخر. يمكنك ببساطة السماح "بالقفز" بين قسمي شريط LED.
الجانب السلبي هو أن هذا يمكن أن يسبب انخفاضًا إضافيًا في الجهد، مما يؤدي إلى انخفاض ناتج الضوء من الصمام الثنائي الباعث للضوء الأبعد عن مصدر الطاقة. والسبب في ذلك هو أن توصيل شرائط LED على التوالي يسمح للتيار بالتدفق عبر مسار واحد فقط. يجب أن يمر كل التيار لكامل تركيب شريط LED بأكمله عبر البوصات القليلة الأولى من شريط LED، مما قد يصبح عنق زجاجة لتدفق التيار، مما يقلل من كمية الجهد والتيار الذي يصل إلى الجزء الأبعد من شريط LED.
الوصلات المتوازية
يتم تطبيق دائرة متوازية عن طريق توصيل الطرف الموجب (+) لشريط LED الأول بالطرف (+) لشريط LED الثاني. يتكرر هذا النمط مع شرائط LED الأخرى، من (+) الشريط الثاني إلى (+) الشريط الثالث، وهكذا.
وفي الوقت نفسه، قم بتوصيل الطرف السالب (-) لشريط LED الأول بـ (-) شريط LED الثاني، ثم قم بتوصيل (-) شريط LED الثاني بـ (-) شريط LED الثالث، وهكذا.

في الدائرة المتوازية لشريط LED، يكون تيار السلسلة هو مجموع قيم التيار لجميع الشرائط، والجهد يساوي جهد شريط LED الأول.
يقلل التوصيل المتوازي من كمية التيار التي يجب أن تتدفق عبر أي مقطع شريط LED معين لأنها متصلة مباشرة بمصدر الطاقة. وهذا يقلل بشكل كبير من إمكانية انخفاض الجهد.
العيب الرئيسي لهذه الطريقة هو أنها تتطلب المزيد من أعمال الأسلاك. يكمن التحدي الرئيسي في أن معظم وحدات الإمداد بالطاقة تحتوي على سلك إخراج موجب واحد وسلك إخراج سالب واحد فقط، لذا لتوصيلها بأقسام شريط LED متعددة، تحتاج إلى تقسيم هذا الإخراج إلى أسلاك متعددة. يمكن استخدام أطراف تقسيم الأسلاك المتخصصة لهذا الغرض.
وتتمثل الصعوبة الأخرى في أن بعض أقسام شريط LED قد تكون موجودة بعيدًا عن مصدر الطاقة. في هذه الحالات، قد تجد أن الأسلاك الطويلة لا تضيف نفقات فحسب، بل يجب أن تكون ذات مقياس كبير بما فيه الكفاية. وإلا سينخفض الجهد في السلك قبل أن تصل حتى إلى قسم شريط LED.
فهم ما هو مضخم الصمام الثنائي الباعث للضوء
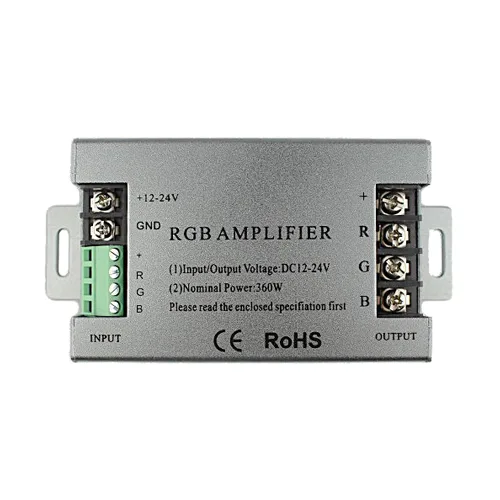
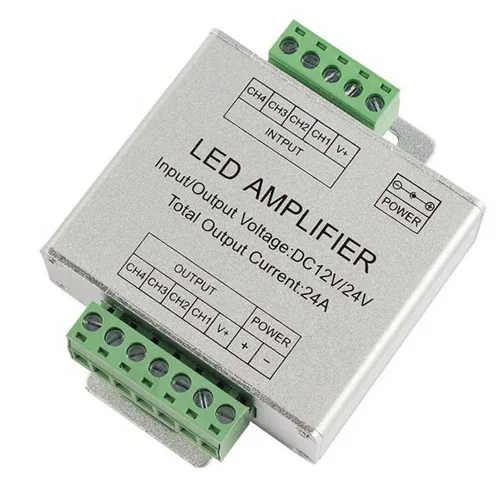
أن مضخم الصمام الثنائي الباعث للضوء هو مضخم يعزز الإشارة الضعيفة في الدائرة بحيث يكون لون وسطوع شريط LED خلفه هو نفس لون وسطوع الشريط السابق. باستخدام مضخم الإشارة، يمكن توصيل المزيد من شرائط LED على التوالي أو على التوازي.
يتم تركيب مضخم LED خلف وحدة تحكم إضاءة LED. بينما يقوم مضخم LED بتضخيم الإشارة المخففة التي تتدفق عبر شريط LED، لا يمكن تجنب توصيل الشرائط. ومع ذلك، بدون مصدر طاقة، لا يعمل المضخم على الإطلاق، لذلك تحتاج إلى توصيل مضخم LED بمصدر الطاقة. ببساطة، يجب توصيل مضخم LED بوحدة التحكم في إضاءة LED، وشريط LED، ومصدر طاقة LED.
ترتبط قوة مضخم LED بقوة شريط LED الذي يتصل به المضخم. إذا كانت طاقة شريط LED المتصل بمضخم LED 36 واط، فيجب أن تكون طاقة المضخم 36 واط على الأقل أيضًا.
بالنسبة لمشاريع أشرطة LED البسيطة، لا يلزم وجود مضخم للصوت. يأتي دور مضخم الصوت عند استخدام أسلاك شرائط LED متعددة أو عندما تلاحظ أن مصابيح LED تخفت بسبب تدهور الإشارة. عند زيادة التحميل على المخفت، تكون طاقة جميع الشرائط أكبر من طاقة المخفت. في هذه الحالة، يمكن استخدام مضخم للصوت لتقسيم الشريط إلى قسمين مع وجود مضخم صوت في المنتصف.
تعرف على ماهية وحدة فك ترميز DMX
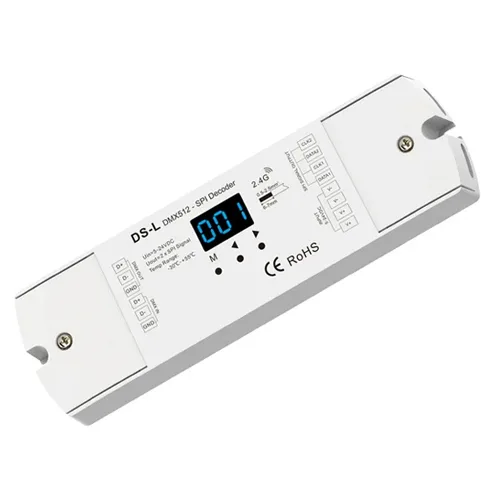
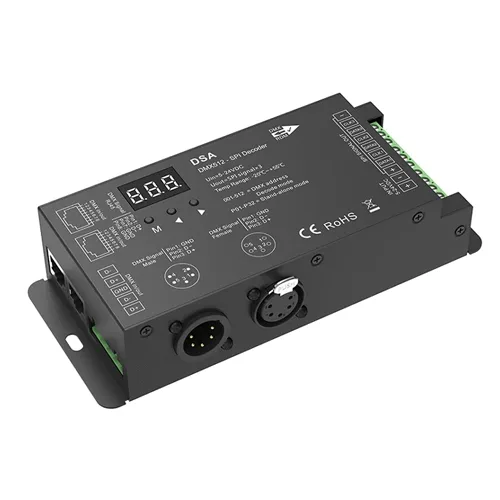
أجهزة فك ترميز DMX متوافقة مع البروتوكولات القياسية الدولية مثل DMX512 وهي أجهزة تقوم بتحويل الإشارات الرقمية DMX512 إلى إشارات قابلة للاستخدام لشرائط LED ذات إمدادات الطاقة ذات الجهد الثابت ومخرجات PWM. تُستخدم وحدات فك ترميز DMX لشرائط LED أحادية اللون و CCT و RGB و RGBW ذات الجهد المنخفض، والقضبان وتجهيزات إضاءة LED الأخرى.
يمكن التحكم في أجهزة فك ترميز DMX بشكل فردي أو دمجها لإنشاء نفس اللون والتأثير على الأضواء التي تتحكم فيها أجهزة استقبال متعددة. هذا الإعداد هو الأنسب للأماكن العامة والمواقع التجارية مثل الحانات والمطاعم. بالنسبة لهذه المشاريع الكبيرة، ستجد أجهزة استقبال DMX مفيدة للغاية.
4 طرق لتوصيل مصابيح شريطية LED أحادية اللون
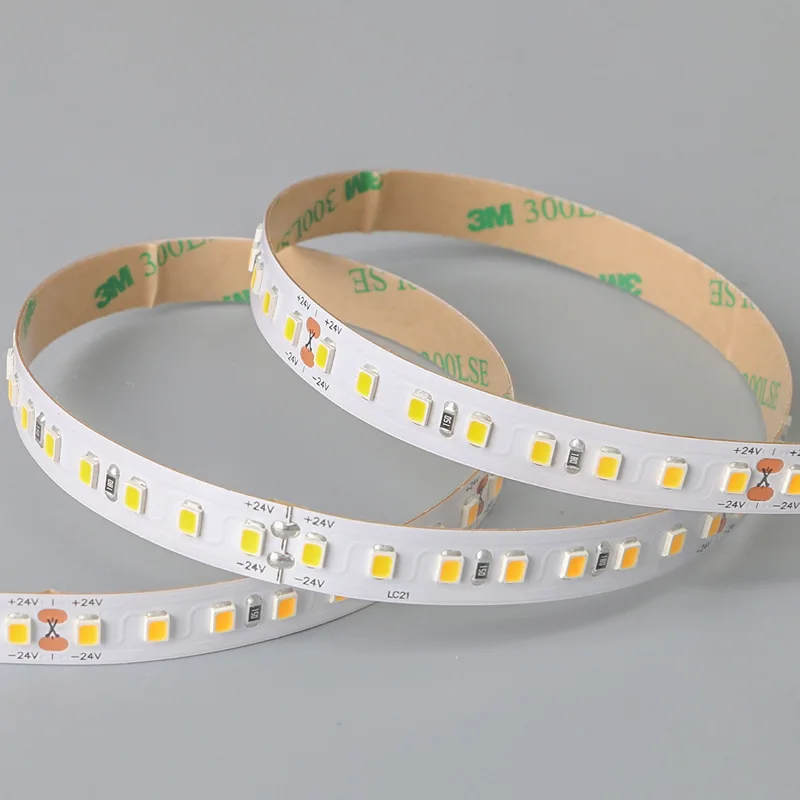
مصباح شريط ضوئي شريطي LED أحادي اللون SMD
كمية الصمام الثنائي الباعث للضوء لكل متر: 30/48/60/72/96/120/128/140
CRI: >80
عرض ثنائي الفينيل متعدد الكلور: 6 مم/8 مم/10 مم/12 مم
درجة حرارة اللون: 2700 كلفن/3000 كلفن/4000 كلفن/6500 كلفن
جهد الإدخال: DC12V/DC24V
الطاقة لكل متر: 6 وات - 24 وات
درجة IP: IP20/IP65/IP67/IP68
الضمان: 5 سنوات
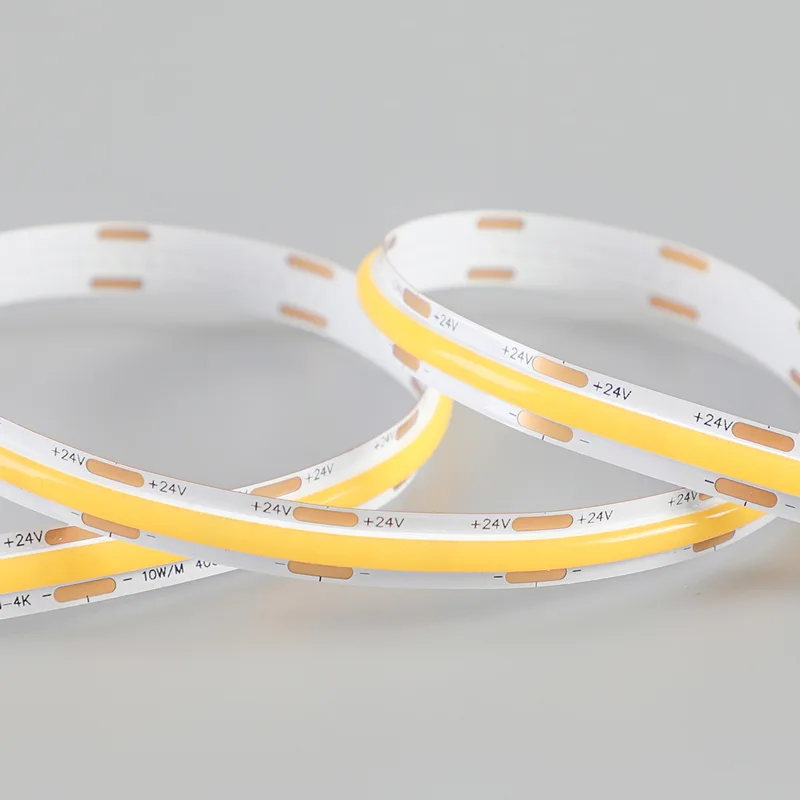
مصباح شريط ضوئي LED أحادي اللون COB LED
CRI: >90
عرض ثنائي الفينيل متعدد الكلور: 8 مم/10 مم
درجة حرارة اللون: 2700 كلفن/3000 كلفن/4000 كلفن/6500 كلفن
جهد الإدخال: DC12V/DC24V
الطاقة لكل متر: 8 واط/10 واط/11 واط/14 واط
الكفاءة: 90 لومن/ثانية - 105 لومن/ثانية
درجة IP: IP20/IP65/IP67/IP68
الضمان: 3 سنوات
مصابيح شريطية LED أحادية اللون بسيطة جداً في توصيلها بالأسلاك. تحتوي مصابيح شريطية LED أحادية اللون على سلكين فقط، أحدهما أحمر والآخر أسود؛ يمثل الأحمر القطب الموجب، ويمثل الأسود القطب السالب.
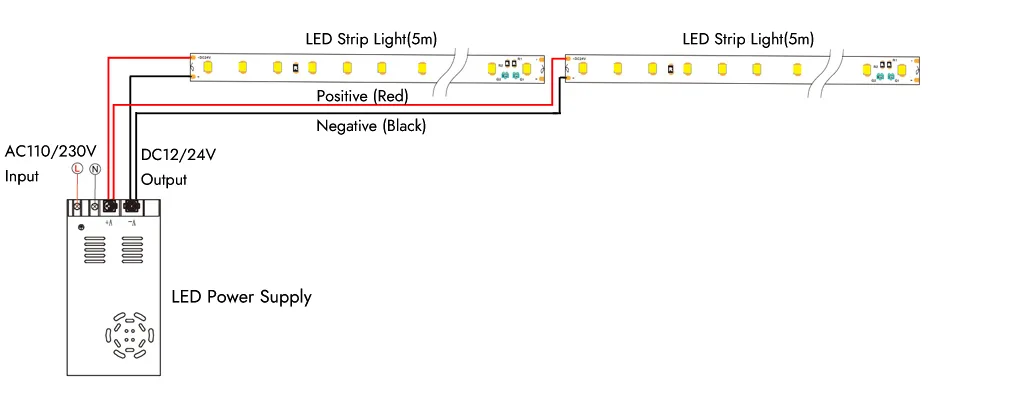
1. مصابيح شريطية LED أحادية اللون ذات أسلاك مباشرة
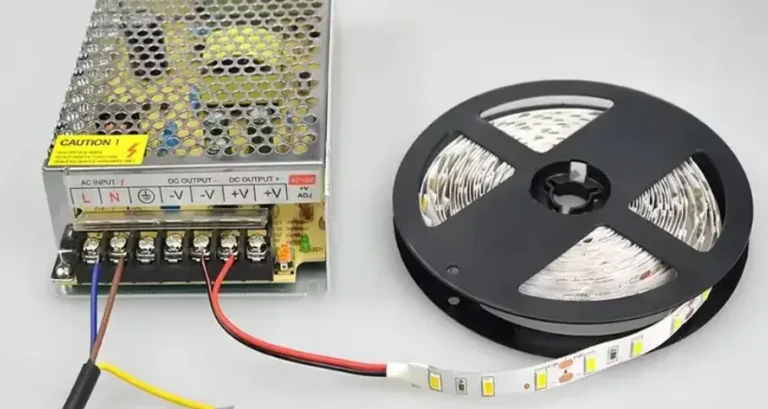
بالنسبة لتوصيل مصابيح الشريط LED أحادية اللون بدون التحكم في التعتيم، ما عليك سوى توصيل السلك الموجب لشريط LED بالإخراج الموجب لمحرك LED والسلك السالب بالإخراج السالب لمحرك LED. يُرجى ملاحظة أن الطاقة الإجمالية لشريط LED يجب ألا تتجاوز 80% من طاقة مزود الطاقة، أي مبدأ 80% من طاقة مزود الطاقة. نظرًا لأن الشريط بجهد 5 فولت به انخفاض في الجهد عند 5 أمتار، فيجب تشغيله عند كلا الطرفين عند التوصيل بمصدر الطاقة لحل مشكلة انخفاض اللون والسطوع الناتج عن انخفاض الجهد، في حين أن الشريط بجهد 12 فولت والشريط بجهد 24 فولت ليس به انخفاض في الجهد عند 5 أمتار، لذلك يمكن تشغيلهما عند طرف واحد.
2. استخدام أسلاك إمداد طاقة التعتيم LED لمصابيح الشريط LED أحادية اللون
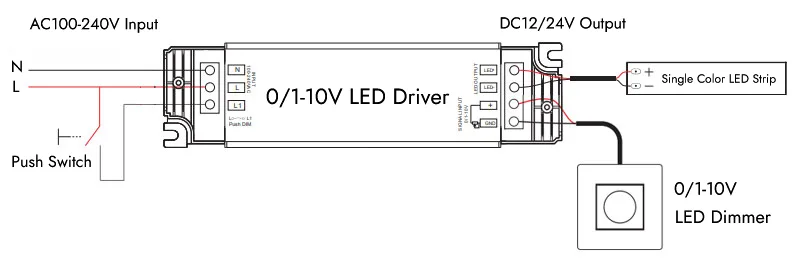
لضبط سطوع شريط LED أحادي اللون، تحتاج إلى توصيل الشريط بمصدر طاقة LED قابل للتعتيم وخافت إضاءة مطابق. أكثر طرق التعتيم شيوعًا هي 0-10 فولت، وترياك و DALI.
- مخططات أسلاك شريط LED أحادي اللون قابل للتعتيم 0-10 فولت
بالنسبة لنظام التعتيم بجهد 0-10 فولت، ستحتاج إلى توصيل كابلات الطاقة الموجبة والسالبة مباشرةً بشريط LED وتوصيل سلك التعتيم بمخفت 0-10 فولت متوافق. يسمح هذا النظام بالتعتيم السلس من سطوع 0% إلى 100%.
- مخططات أسلاك التعتيم بمصباح LED شريطي أحادي اللون بمصباح LED ثلاثي التعتيم
تستخدم أنظمة التعتيم ثلاثية الترياك مخفتات ثلاثية الترياك لتنظيم الجهد المزود لشريط LED. ويضمن توصيل المخفتات بجهد الإمداد قبل مشغل الصمام الثنائي الباعث للضوء (LED) أن تكون جميع المكونات متوافقة مع الترياك.

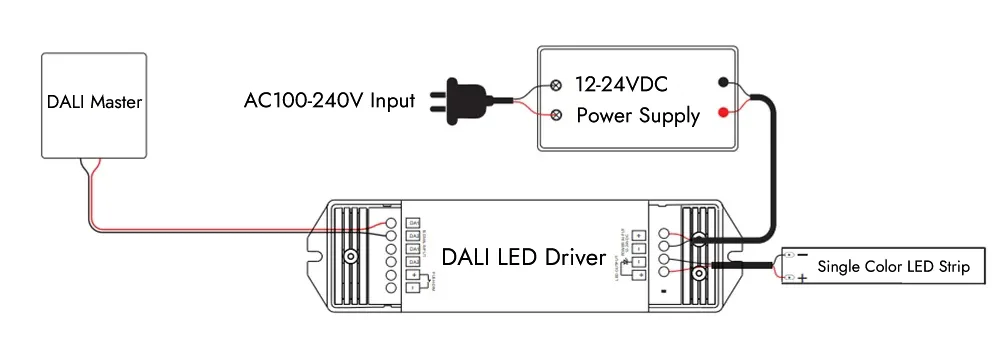
- مخطط أسلاك التعتيم DALI لمصابيح الشريط LED أحادية اللون
يوفر نظام DALI التعتيم الرقمي عبر بروتوكول تحكم ثنائي الأسلاك. قم بتوصيل مشغل DALI LED بوحدة تحكم DALI لضمان التكوين المناسب داخل شبكة DALI للتعتيم سريع الاستجابة.
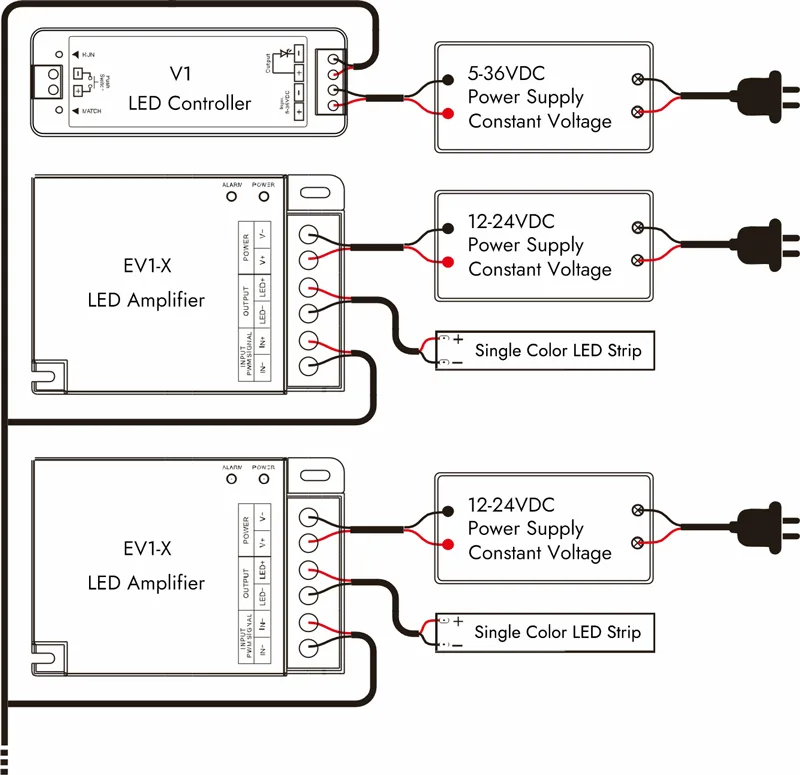
3. توصيل شرائط الصمام الثنائي الباعث للضوء (LED) أحادية اللون بوحدات تحكم الصمام الثنائي الباعث للضوء (LED)
وبالإضافة إلى ذلك، يمكن توصيل شرائط LED أحادية اللون بـ وحدة تحكم الصمام الثنائي الباعث للضوء لضبط السطوع.
- لا يأتي مع مكبر صوت LED
عند استخدامك لوحدة تحكم LED لتوصيل عدد صغير من شرائط LED، لا يلزم وجود مضخم LED. قم بتوصيل شريط LED مباشرة بوحدة تحكم LED، مع التأكد من صحة القطبين الموجب والسالب. يسمح هذا الإعداد بالتحكم الأساسي في التشغيل/إيقاف التشغيل وضبط السطوع باستخدام جهاز التحكم عن بُعد.

- مع مضخم الصمام الثنائي الباعث للضوء LED
بالنسبة لمشاريع الإضاءة الكبيرة، يلزم وجود العديد من شرائط LED. عندما يتم توصيل العديد من شرائط LED بوحدة التحكم، يلزم وجود مضخم لمصابيح LED. يحافظ هذا الإعداد على قوة الإشارة ويمنع انخفاض الجهد على مسافات طويلة.
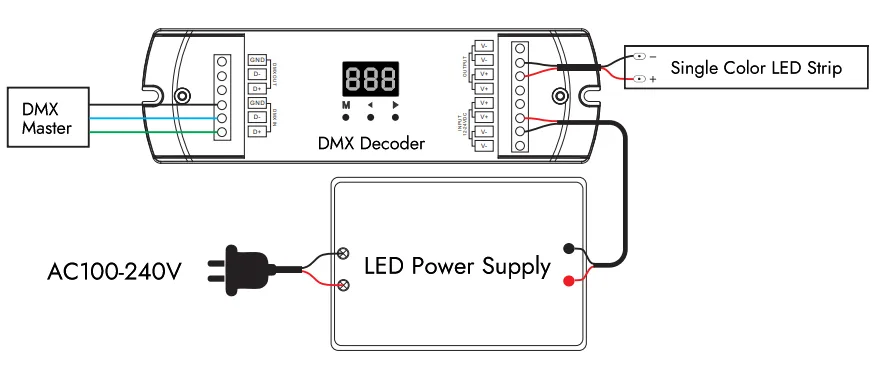
4. توصيل أسلاك شرائط LED أحادية اللون مع وحدة فك ترميز DMX
قم بتوصيل مدخل وحدة فك ترميز DMX512 بوحدة تحكم DMX وتوصيل المخرج بشريط LED. يتيح ذلك التحكم في مصابيح LED بواسطة أوامر DMX وهو مناسب لإعدادات الإضاءة المعقدة.
5 طرق لتوصيل مصابيح شريطية LED بيضاء قابلة للضبط بالأسلاك
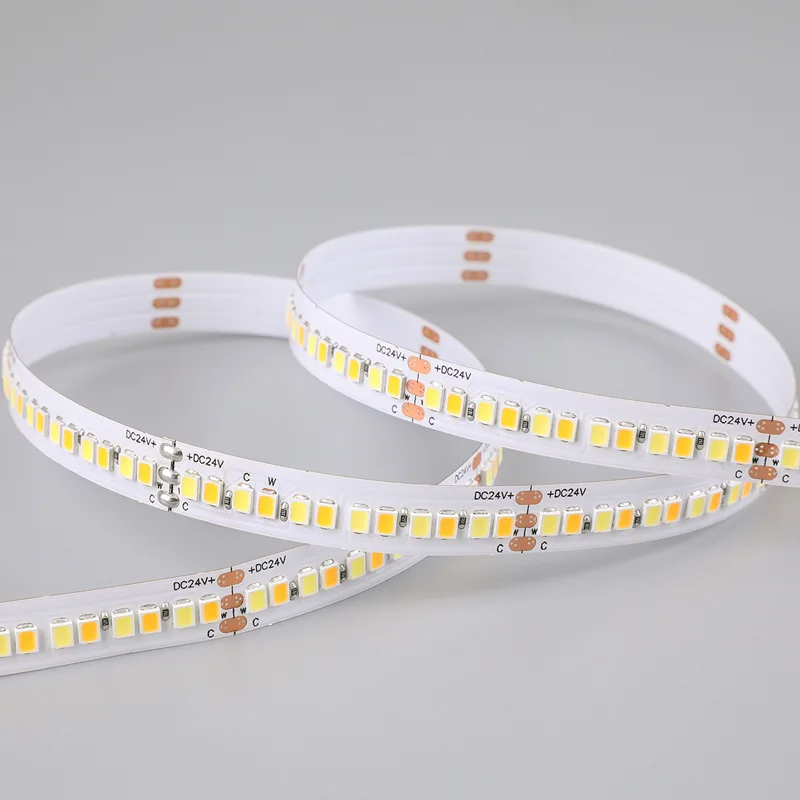
شريط إضاءة LED شريطي LED أبيض SMD قابل للتعديل
كمية الصمام الثنائي الباعث للضوء لكل متر: 60/112/120
CRI: >80
عرض ثنائي الفينيل متعدد الكلور: 10 مم
درجة حرارة اللون: 2700 كلفن - 6500 كلفن قابلة للتغيير
جهد الإدخال: DC12V/DC24V
الطاقة لكل متر: 19.2 واط/24 واط
درجة IP: IP20/IP65/IP67/IP68
الضمان: 5 سنوات
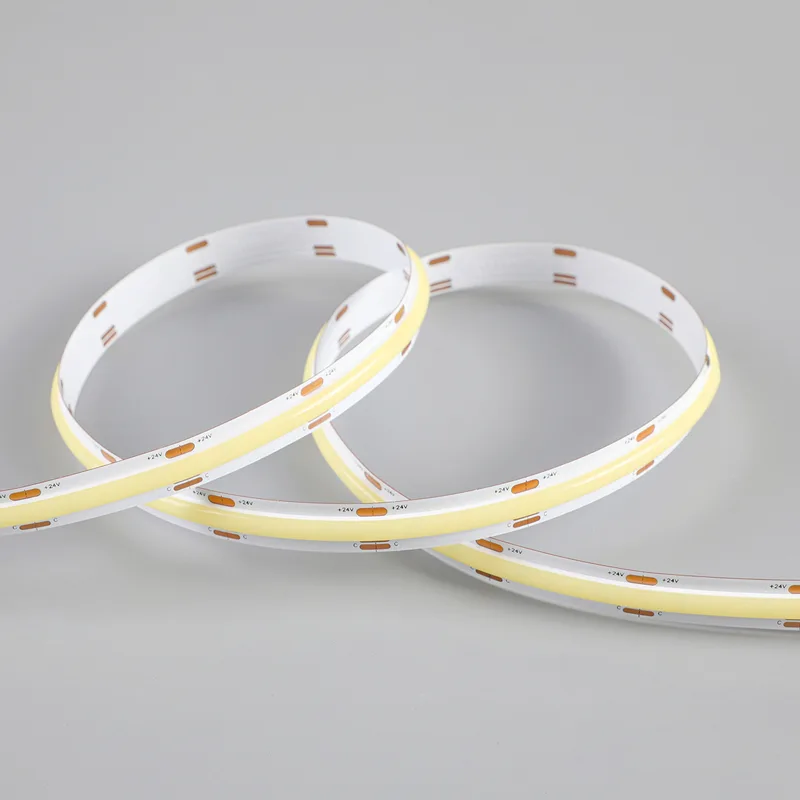
شريط إضاءة LED شريطي COB أبيض قابل للتعديل
CRI: >90
عرض ثنائي الفينيل متعدد الكلور: 10 مم
درجة حرارة اللون: 2700 كلفن - 6500 كلفن قابلة للتغيير
جهد الإدخال: DC12V/DC24V
الطاقة لكل متر: 14 وات/16 وات
الطول القابل للقطع: 26.31 مم/50 مم
درجة IP: IP20/IP65/IP67/IP68
الضمان: 3 سنوات
مصابيح الشريط LED البيضاء القابلة للضبط، والمعروفة أيضًا باسم مصابيح الشريط LED القابلة للضبط CCT، تحتوي عادةً على ثلاثة أسلاك ومصابيح LED بدرجات حرارة ألوان مختلفة: الأحمر للسالب الموجب والأبيض للسالب الأبيض والأصفر للسالب الأبيض الدافئ. يمكنك ضبط سطوع هذين المصباحين المختلفين CCT LED لتغيير CCT المختلط.
1. أسلاك شرائط LED بيضاء قابلة للضبط مع وحدة تحكم LED
إذا كان لديك عدد قليل من شرائط LED البيضاء القابلة للضبط، يمكنك توصيل الشرائط مباشرة بوحدة تحكم LED متوافقة. يتيح لك ذلك ضبط درجة حرارة اللون يدوياً بدون تضخيم. أما إذا كنت بحاجة إلى توصيل عدد أكبر من شرائط LED البيضاء القابلة للضبط، فستحتاج إلى مضخم LED.
- بدون مخطط أسلاك مكبر الصوت LED

- مع مخطط أسلاك مكبر الصوت LED

2. استخدم مزود طاقة LED خافت للضوء لتوصيل شرائط LED بيضاء قابلة للضبط
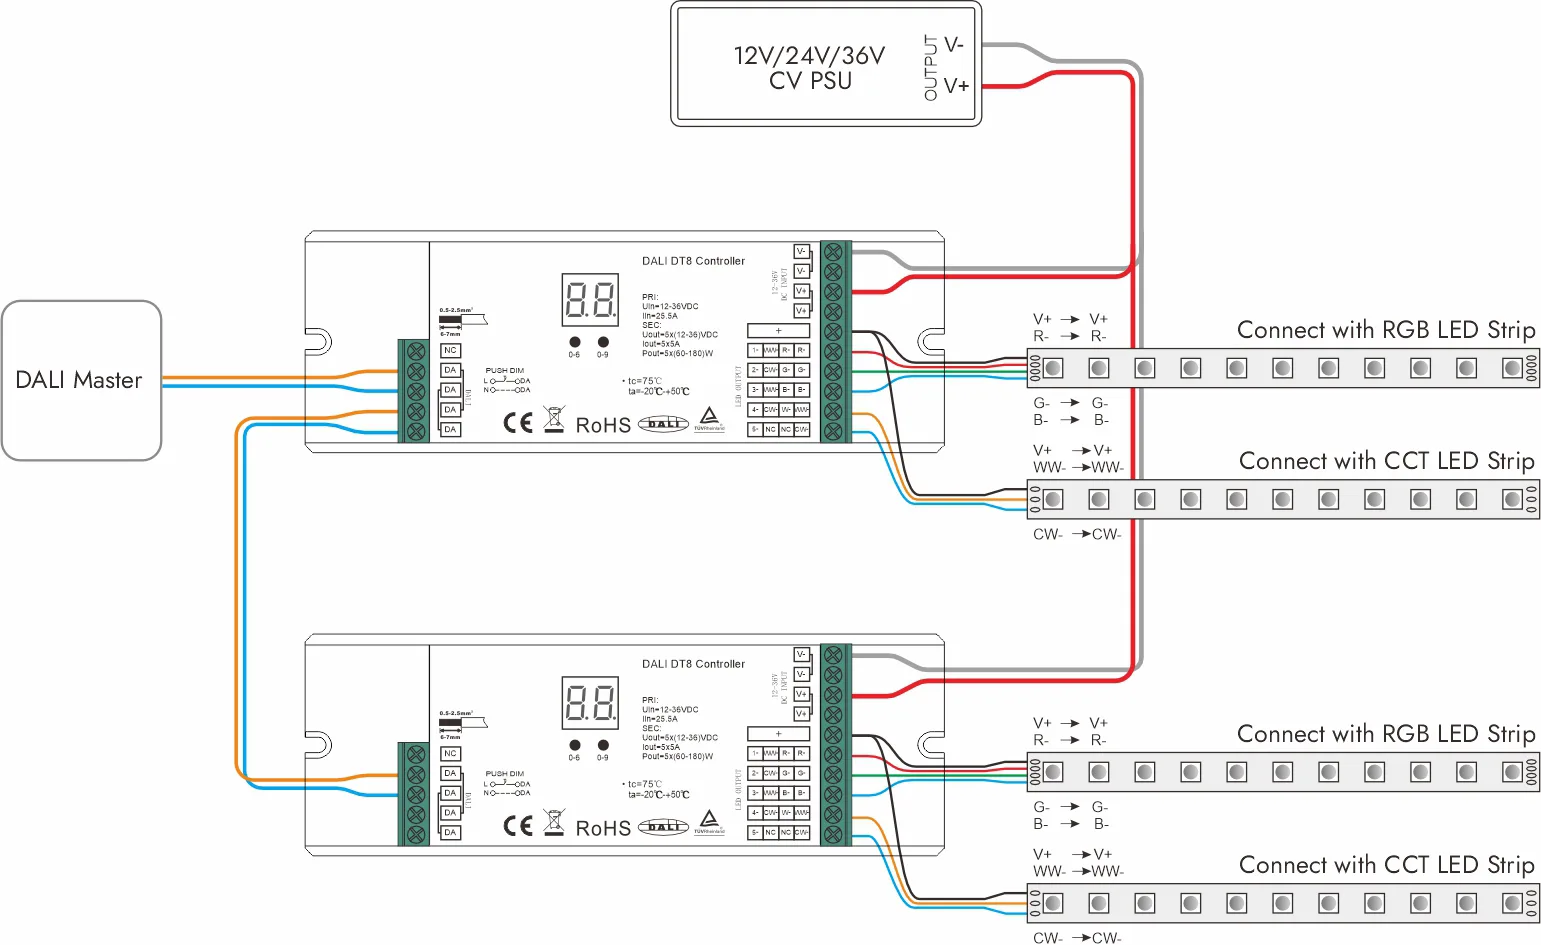
في معظم الحالات، لا يمكن استخدام مصادر طاقة التعتيم إلا لضبط سطوع شرائط LED أحادية اللون. ومع ذلك، أضافت DALI بروتوكول DALI بروتوكول DT8 لدعم شرائط LED القابلة للتعتيم باللون الأبيض و RGB و RGBW و RGBCCT. قم بتوصيل شريط LED بمشغل DALI DT8 وبرمجة المشغل عبر شبكة DALI للانتقال السلس من الألوان الدافئة إلى الألوان الباردة.
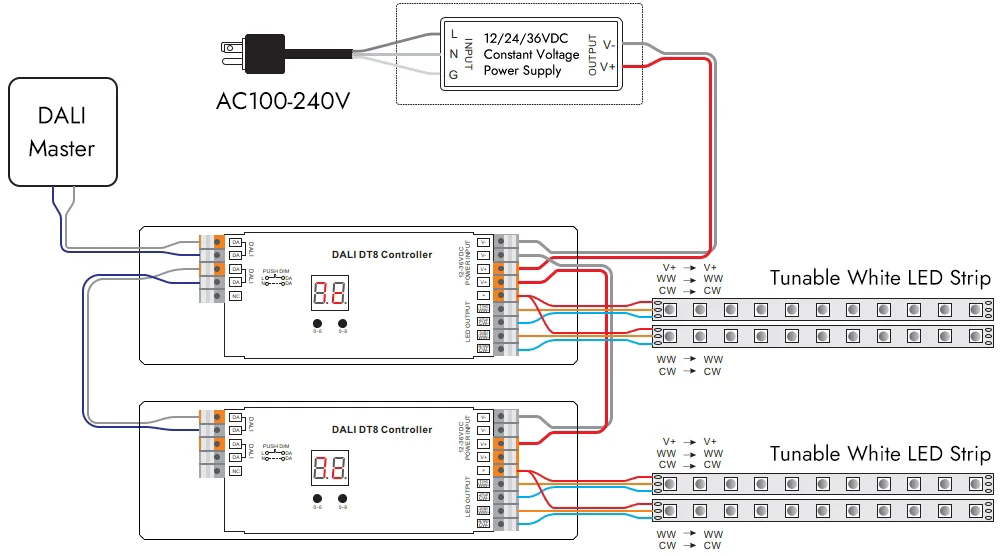
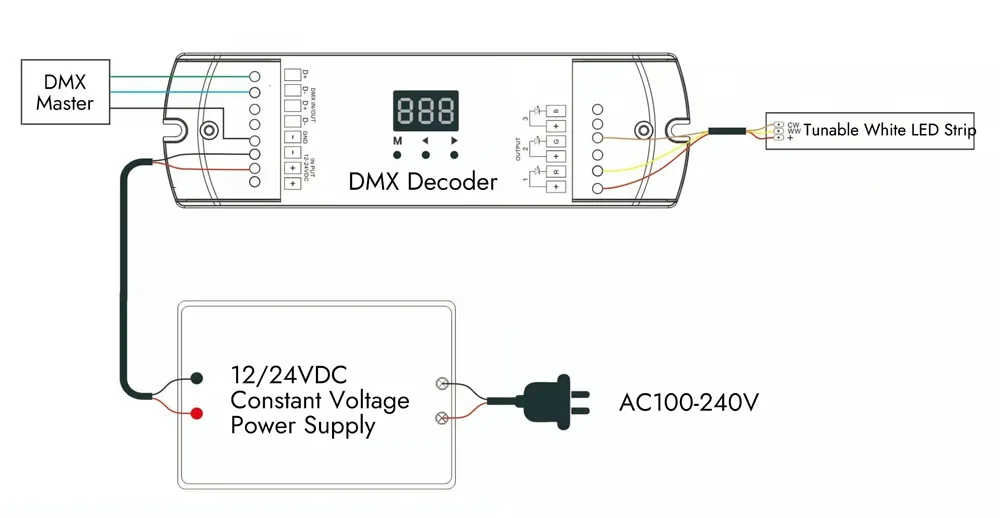
3. توصيل شرائط الصمام الثنائي الباعث للضوء (LED) البيضاء القابلة للضبط بأسلاك مع وحدات فك ترميز DMX
بشكل عام، لا توجد وحدة فك ترميز DMX512 مخصصة (خرج ثنائي القناة) لشرائط LED ذات درجة حرارة اللون القابلة للتعديل. ولكن يمكننا استخدام وحدة فك ترميز DMX512 بمخرج 3 قنوات أو 4 قنوات للتحكم في شريط LED القابل للتعديل في درجة حرارة اللون. قم بتوصيل وحدة فك الترميز بين وحدة تحكم DMX وشريط LED لضبط درجة حرارة اللون بدقة عبر أوامر DMX.
4. استخدام شرائط الصمام الثنائي السلكي الأبيض القابل للضبط
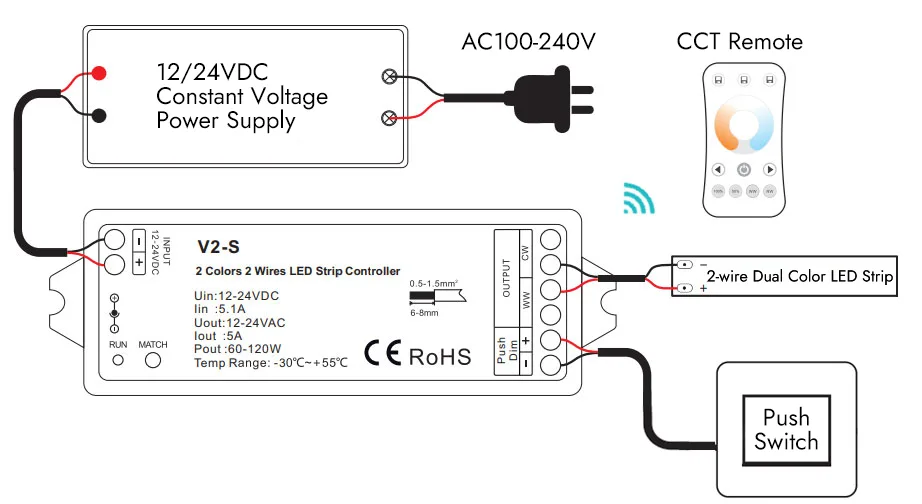
ينتمي شريط LED الأبيض القابل للضبط بسلكين إلى النوع النادر من أشرطة LED التي تحتوي على سلكين فقط؛ فمصابيح LED البيضاء الدافئة ومصابيح LED البيضاء الباردة لهذا الشريط لها أقطاب كهربائية متقابلة. تحتوي مصابيح LED البيضاء الدافئة ومصابيح LED البيضاء الباردة على أقطاب كهربائية متقابلة. تتطلب شرائط LED البيضاء القابلة للضبط بسلكين استخدام وحدة تحكم LED متخصصة.
5. إضاءة شريطية LED بيضاء قابلة للتعديل مع مفتاح تشغيل/إيقاف تشغيل الحائط
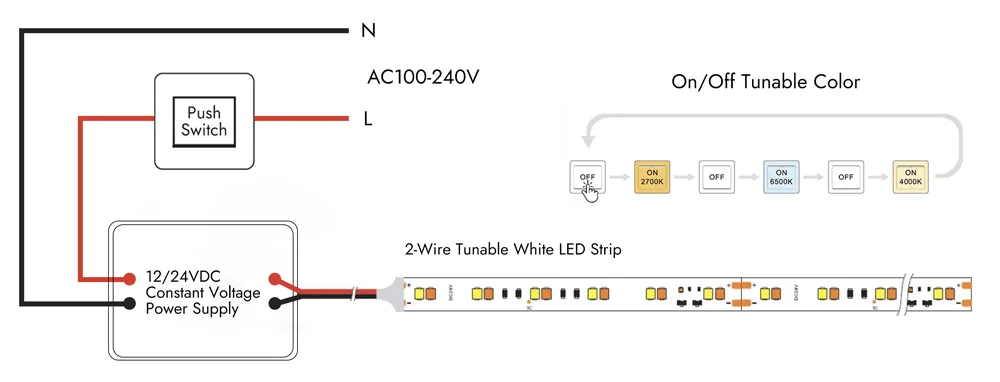
مفتاح تشغيل/إيقاف تشغيل الحائط لا يحتاج شريط LED الأبيض القابل للضبط إلى وحدة تحكم أو جهاز استقبال LED لضبط درجة حرارة اللون؛ فقط اقلب مفتاح الحائط لتشغيل/إيقاف تشغيل شريط LED الأبيض القابل للضبط، وهو سهل التشغيل. ومع ذلك، يتوفر شريط LED هذا بثلاث درجات حرارة لونية فقط (2700 كلفن و4000 كلفن و6500 كلفن)، والتي تتغير مع كل دورة تشغيل/إيقاف تشغيل وتعود إلى اللون الأبيض الدافئ (2700 كلفن) بعد أكثر من 6 ثوانٍ من الإيقاف.
3 طرق لتوصيل أضواء الشريط RGB LED السلكية
شريط إضاءة SMD RGB LED شريطي SMD RGB
كمية الصمام الثنائي الباعث للضوء لكل متر: 60/96/120
CRI: غير متاح
عرض ثنائي الفينيل متعدد الكلور: 10 مم
اللون: RGB
جهد الإدخال: DC12V/DC24V
الطاقة لكل متر: 12 واط/19 واط/22 واط
درجة IP: IP20/IP65/IP67/IP68
الضمان: 3 سنوات
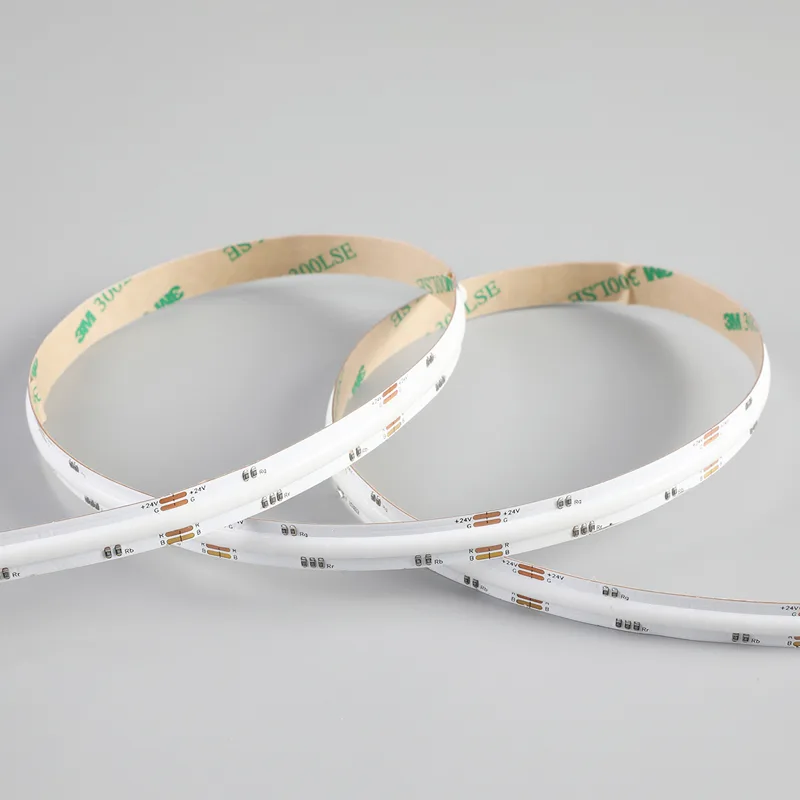
مصباح شريطي COB RGB LED
CRI: غير متاح
عرض ثنائي الفينيل متعدد الكلور: 10 مم
اللون: RGB
جهد الإدخال: DC12V/DC24V
الطاقة لكل متر: 14 وات
الطول القابل للقطع: 31.25 مم/62.5 مم/33.33 مم/50 مم
درجة IP: IP20/IP65/IP67/IP68
الضمان: 3 سنوات
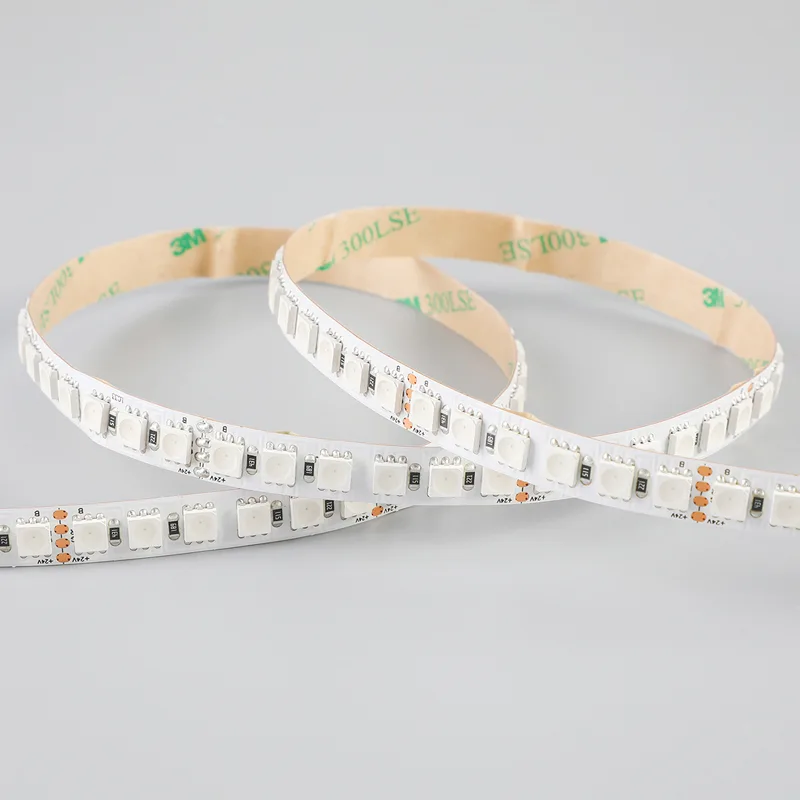
تحتوي مصابيح RGB LED الشريطية على أربعة أسلاك: أسود وأحمر وأخضر وأخضر وأزرق. ويمثل السلك الأسود القطب الموجب، وتمثل الأسلاك الأحمر والأخضر والأزرق القطب السالب، وهو ما يتوافق مع رقائق LED R و G و B على التوالي. تستخدم مصابيح الشريط RGB LED بشكل أساسي مع وحدات تحكم LED لتحقيق مزج الألوان والتأثيرات.
1. توصيل مصابيح الشريط السلكي RGB LED مع وحدة تحكم LED
بالنسبة للتركيبات الأقصر لشرائط RGB LED حيث لا تمثل قوة الإشارة مشكلة، يمكن تحقيق خلط الألوان الأساسية والتحكم فيها عن طريق التوصيل مباشرةً بوحدة تحكم RGB LED. عندما تكون هناك حاجة إلى شرائط RGB أطول أو سطوع أعلى، يجب إضافة مضخم LED لضمان اتساق اللون والسطوع في جميع أنحاء التركيب.
- بدون مخطط أسلاك مكبر الصوت LED


- مع مخطط أسلاك مكبر الصوت LED

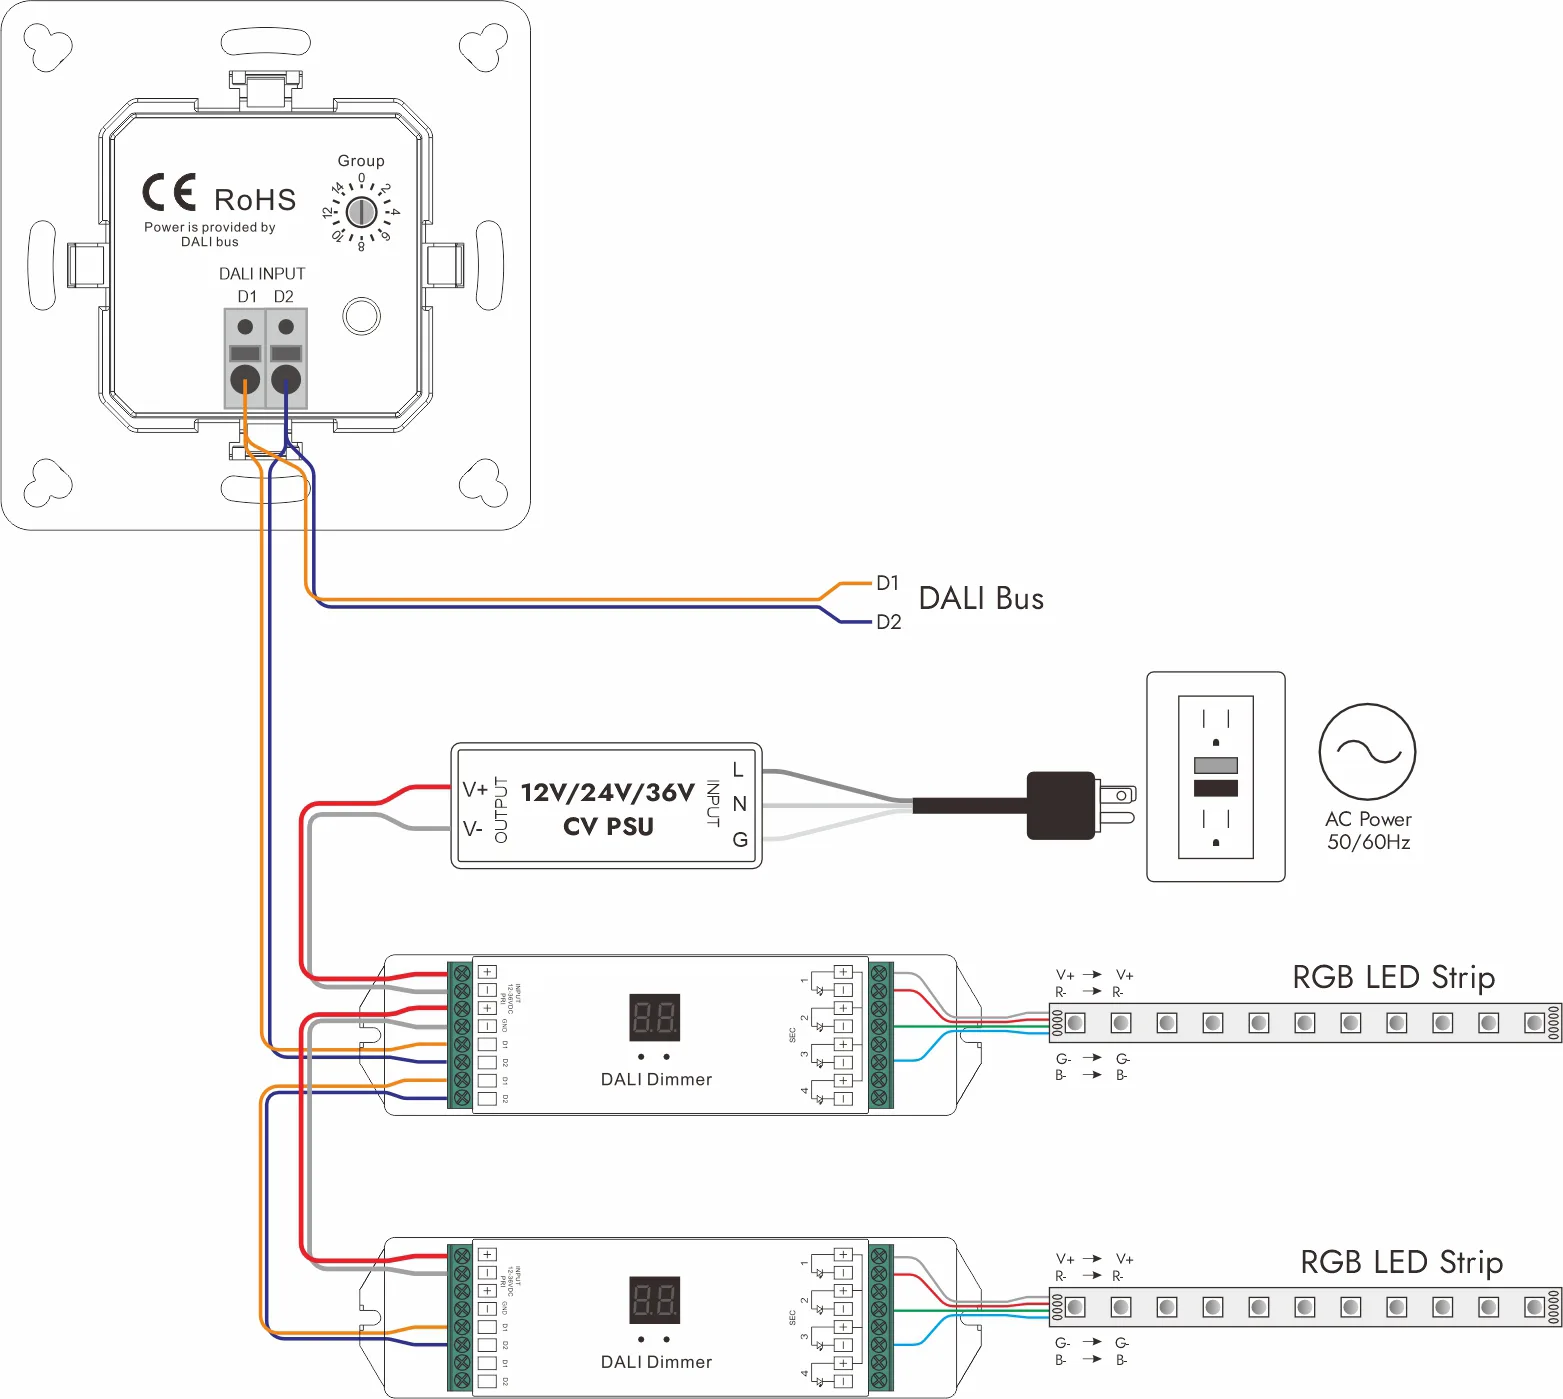
2. أسلاك مصابيح شريطية RGB LED مع برامج تشغيل LED قابلة للتعتيم
يمكن أيضًا استخدام شرائط RGB LED مع برامج تشغيل DALI DT8 القابلة للتعتيم. ستحتاج إلى توصيل كل قناة لونية لشريط RGB بمنفذ الإخراج المناسب في برنامج التشغيل. يتيح هذا الإعداد التحكم الرقمي في كل قناة لونية عبر بروتوكول DALI.
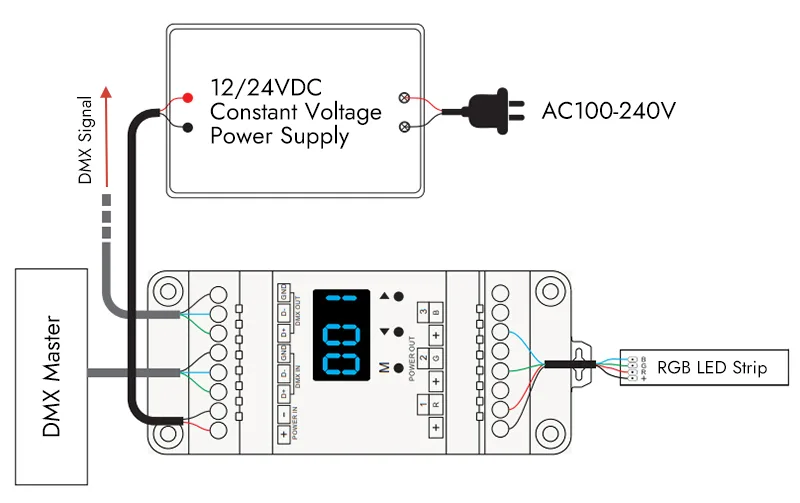
3. توصيل شريط RGB LED باستخدام وحدة فك ترميز DMX
قم بدمج شرائط (ليد) RGB في نظام الإضاءة DMX الخاص بك باستخدام وحدات فك ترميز DMX512 المصممة للتحكم في RGB، مما يتيح لك تأثيرات الإضاءة المتطورة والتحكم في المشهد.
3 طرق لتوصيل مصابيح الشريط الضوئي RGBW LED السلكية
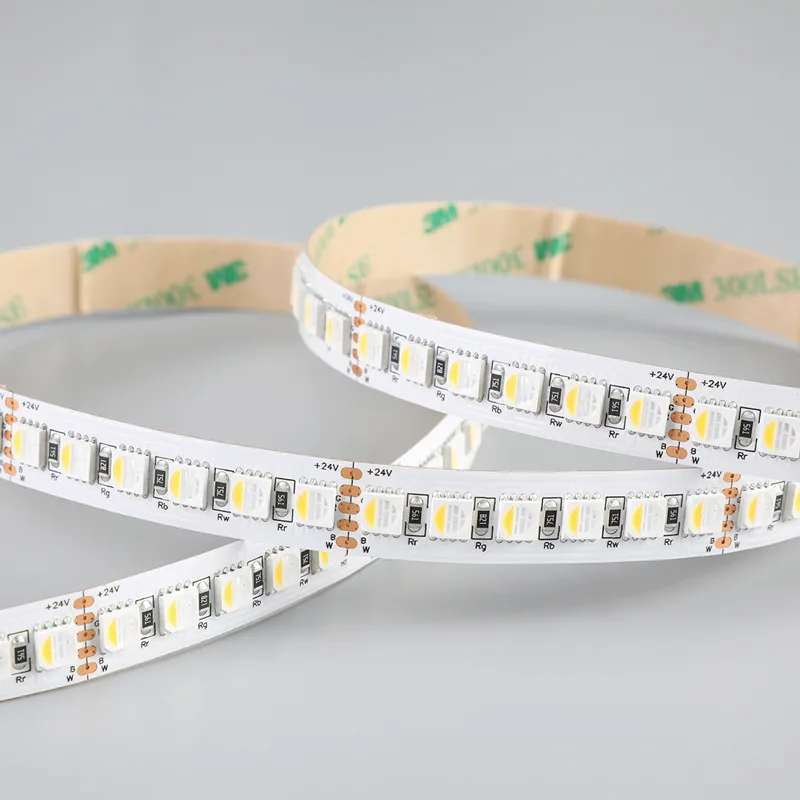
شريط إضاءة SMD RGBW LED شريطي SMD RGBW
كمية الصمام الثنائي الباعث للضوء لكل متر: 60/120
CRI: غير متاح
عرض ثنائي الفينيل متعدد الكلور: 10 مم
اللون: RGBW
جهد الإدخال: DC12V/DC24V
الطاقة لكل متر: 12 واط/22 واط
درجة IP: IP20/IP65/IP67/IP68
الضمان: 3 سنوات
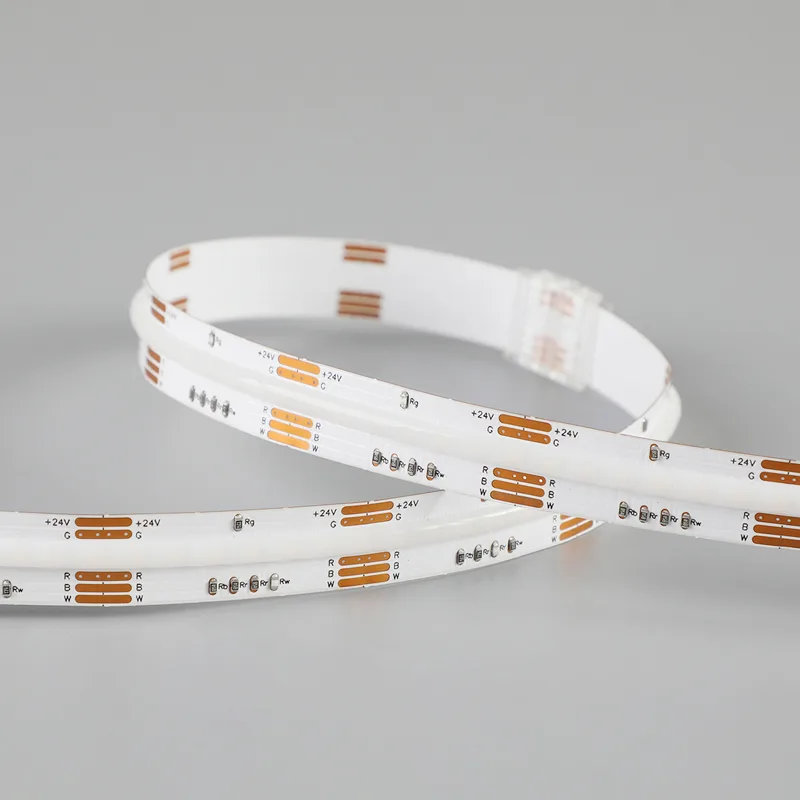
شريط إضاءة COB RGBW LED الشريطي
CRI: غير متاح
عرض ثنائي الفينيل متعدد الكلور: 12 مم
اللون: RGBW
جهد الإدخال: DC24 فولت تيار مستمر 24 فولت
الطاقة لكل متر: 19 وات
الطول القابل للقطع: 71.42 ملم
درجة IP: IP20/IP65/IP67/IP68
الضمان: 3 سنوات
أضواء شريطية LED RGBW LED تحتوي على خمسة أسلاك: وهي الأسود والأحمر والأخضر والأخضر والأزرق والأبيض. ويمثل السلك الأسود القطب الموجب، وتمثل الأسلاك الأحمر والأخضر والأزرق والأزرق والأبيض القطب السالب، والتي تتوافق مع رقائق LED R و G و B و W على التوالي.
1. توصيل مصابيح الشريط السلكي RGBW LED مع وحدة تحكم LED
- بدون مخطط أسلاك مكبر الصوت LED

- مع مخطط أسلاك مكبر الصوت LED

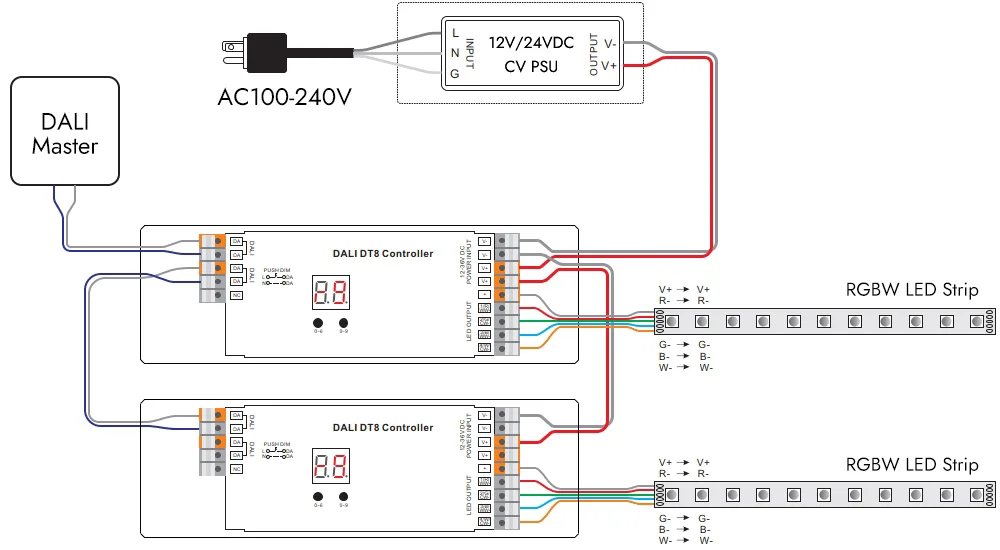
2. استخدم برنامج تشغيل DALI DT8 الخافت لمصباح LED القابل للتعتيم DALI DT8 لتوصيل مصباح الشريط LED RGBW
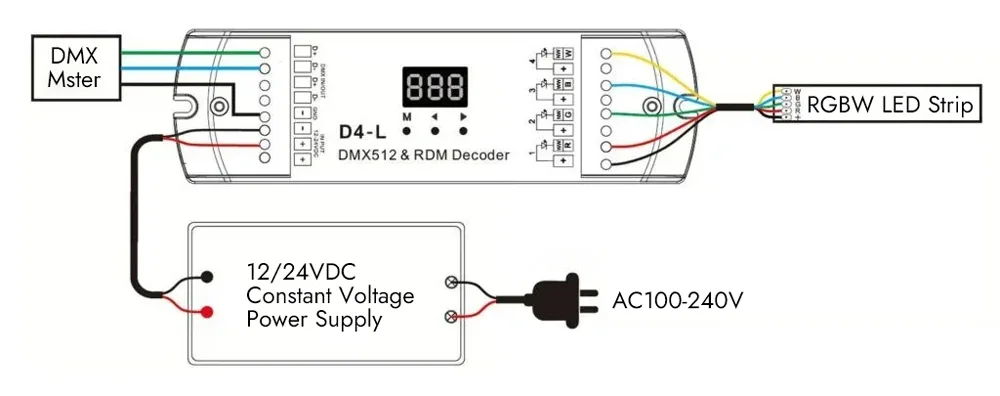
3. استخدام وحدة فك ترميز DMX لتوصيل مصباح الشريط LED RGBW
استخدم أجهزة فك ترميز DMX512 لدمج شرائط (ليد) RGBW في أنظمة إضاءة DMX للحصول على تأثيرات إضاءة متطورة والتحكم في المشهد، بالإضافة إلى التحكم الدقيق في اللون والضوء الأبيض.
3 طرق لتوصيل أضواء الشريط RGBCBCCT LED السلكية
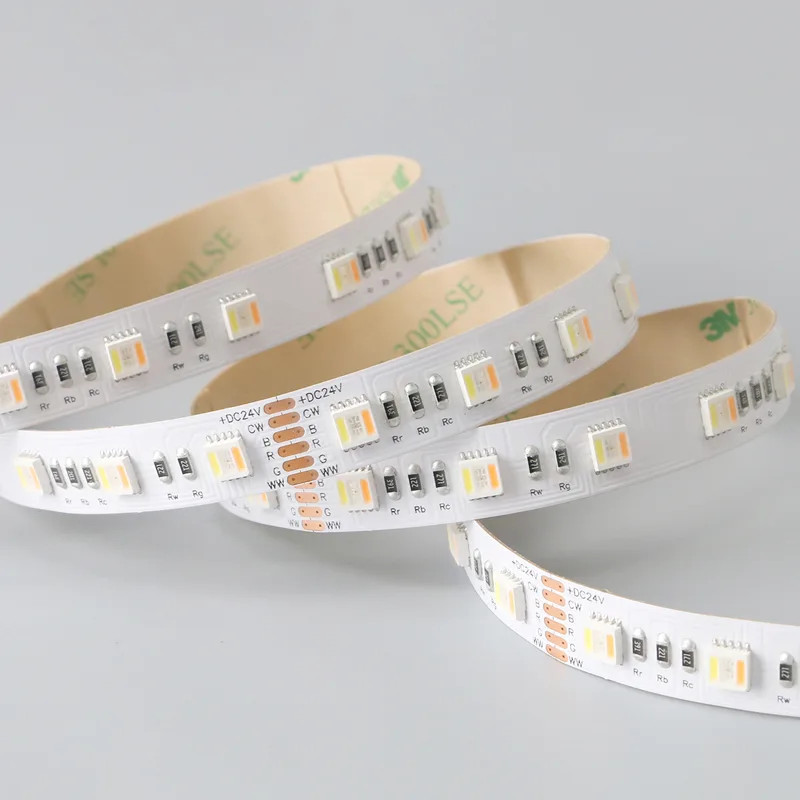
شريط إضاءة SMD RGBCBCCT LED شريطي LED
كمية الصمام الثنائي الباعث للضوء لكل متر: 60/96
CRI: غير متاح
عرض ثنائي الفينيل متعدد الكلور: 12 مم
اللون: RGBCCT
جهد الإدخال: DC12V/DC24V
الطاقة لكل متر: 12 واط/19 واط
درجة IP: IP20/IP65/IP67/IP68
الضمان: 3 سنوات
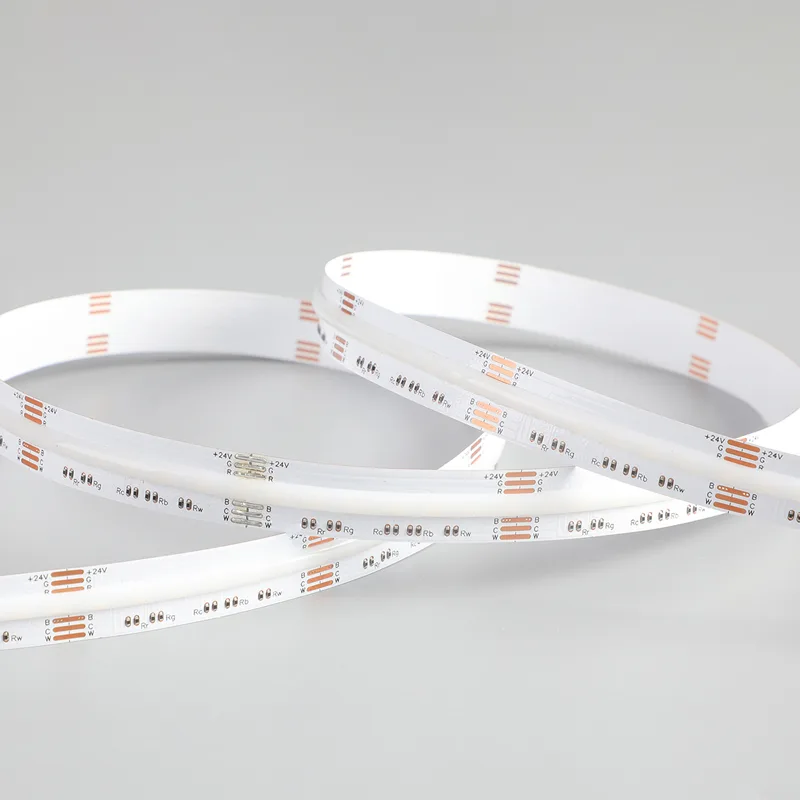
مصباح شريطي COB RGBCBCCT LED
CRI: غير متاح
عرض ثنائي الفينيل متعدد الكلور: 12 مم
اللون: RGBCCT
جهد الإدخال: DC24 فولت تيار مستمر 24 فولت
الطاقة لكل متر: 21 وات
الطول القابل للقطع: 35.71 مم
درجة IP: IP20/IP65/IP67/IP68
الضمان: 3 سنوات
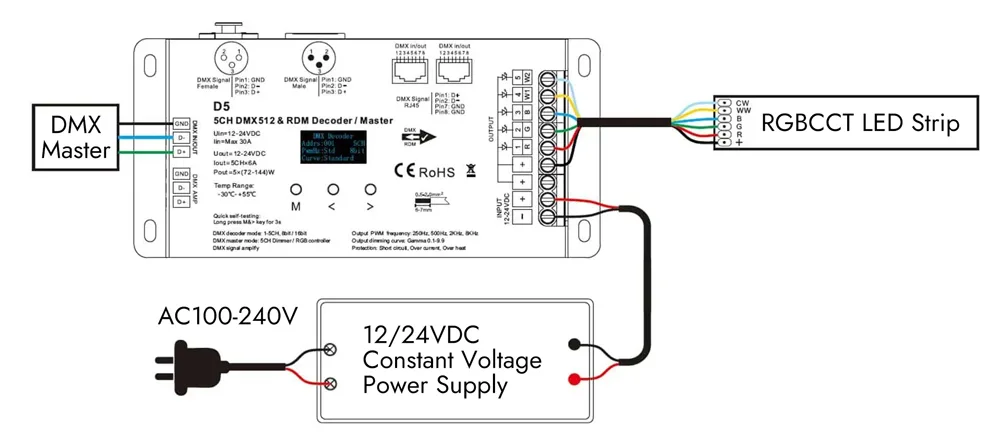
تشتمل شرائط RGBCCT LED على قنوات حمراء وخضراء وزرقاء وبيضاء مزدوجة (أبيض بارد وأبيض دافئ). وهذا يسمح بمجموعة كاملة من الألوان بالإضافة إلى درجات حرارة ألوان قابلة للتعديل، مما يوفر ألوانًا نابضة بالحياة وإضاءة بيضاء قابلة للتخصيص.تحتوي مصابيح الشريط LED RGBCBCCT على إجمالي ستة أسلاك، وهي الأسود والأحمر والأخضر والأخضر والأزرق والأبيض والأصفر. يمثل السلك الأسود الطرف الموجب، وتمثل الأسلاك الأحمر والأخضر والأزرق والأزرق والأبيض والأصفر الأطراف السالبة، والتي تتوافق مع رقائق LED R و G و B و CW و WW على التوالي.
1. توصيل مصابيح شريطية RGBCBCCT LED مع وحدة تحكم LED
- بدون مخطط أسلاك مكبر الصوت LED

- مع مخطط أسلاك مكبر الصوت LED


2. استخدم برنامج تشغيل الصمام الثنائي الباعث للضوء DALI DT8 القابل للتعتيم لتوصيل مصباح الشريط LED RGBCCT
3. استخدام وحدة فك ترميز DMX لتوصيل مصباح الشريط LED RGBCCT
3 طرق لتوصيل مصابيح LED الشريطية القابلة للعنونة SPI
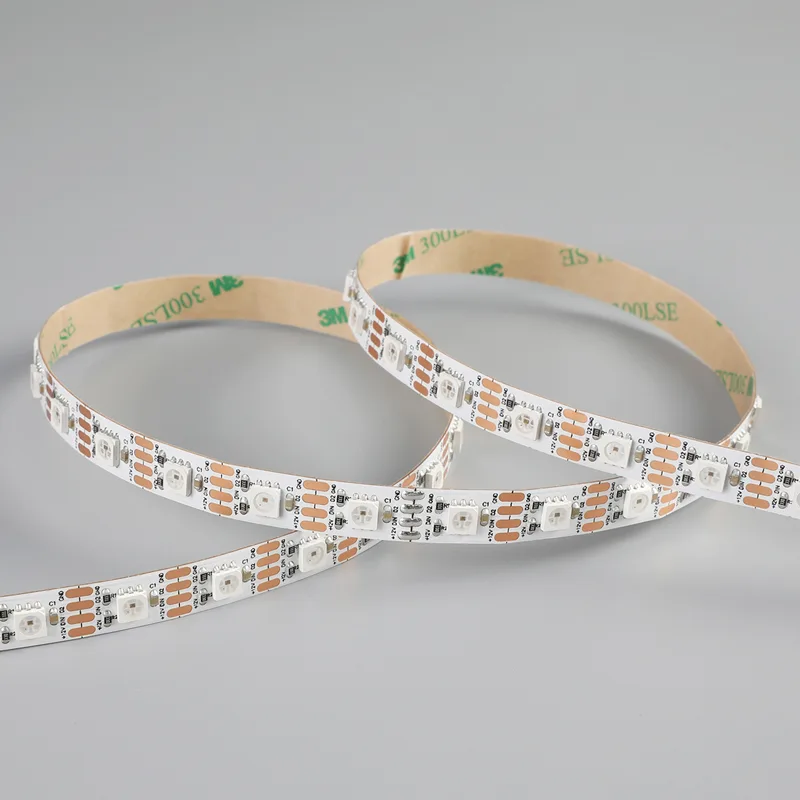
مصباح شريط LED شريطي LED قابل للعنونة SPI SMD
كمية الصمامات الثنائية الباعثة للضوء لكل متر: 30/32/48/60/84/96/144
نوع IC: SK6812/SK9822/WS2801/WS2805/WS2811/WS2812B/WS2813/WS2814/WS2815
عرض ثنائي الفينيل متعدد الكلور: 10 مم/12 مم/14 مم
اللون: RGB/RGBW/RGBBCCT
جهد الإدخال: دي سي 5 فولت / دي سي 5 فولت / دي سي 12 فولت / دي سي 24 فولت
القدرة لكل متر: 9 وات - 43.2 وات
درجة IP: IP20/IP65/IP67/IP68
الضمان: 3 سنوات
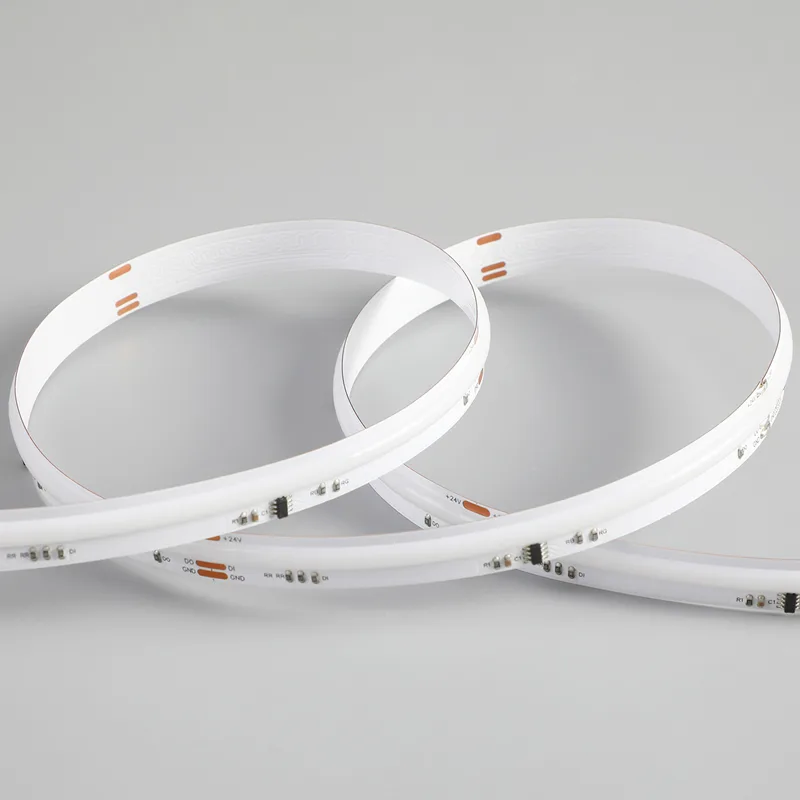
مصباح شريطي LED قابل للعنونة SPI COB LED
نوع الدائرة المتكاملة: WS2811/WS2814
عرض ثنائي الفينيل متعدد الكلور: 10 مم/12 مم
اللون: RGB/RGBW
جهد الإدخال: DC12V/DC24V
الطاقة لكل متر: 8 وات - 21 وات
درجة IP: IP20/IP65/IP67/IP68
الضمان: 3 سنوات
شرائط LED قابلة للعنونة بشكل فرديتُعرف أيضًا باسم شرائط LED الرقمية أو شرائط LED الرقمية أو شرائط LED بكسل أو شرائط LED السحرية أو شرائط LED الملونة الخيالية، وهي شرائط LED مزودة بدائرة متكاملة للتحكم تتيح لك التحكم في مصابيح LED فردية أو مجموعات من مصابيح LED. يمكنك التحكم في أجزاء محددة من شريط LED، وهذا هو سبب تسميتها "قابلة للعنونة".
SPI (الواجهة الطرفية التسلسلية) هي مواصفات واجهة اتصال تسلسلي متزامن تستخدم بشكل أساسي للاتصال قصير المدى في الأنظمة المدمجة. يُستخدم بروتوكول SPI بشكل شائع للتحكم في شرائط LED القابلة للعنونة SPI (أو البكسل). يتلقى شريط LED القابل للعنونة SPI إشارات SPI مباشرةً ويغير لون وسطوع الضوء بناءً على الإشارات. نظرًا لقدرته على نقل أكثر من 512 قيمة، يمكنه التحكم في ما يصل إلى 1000 بكسل RGB LED فردي.
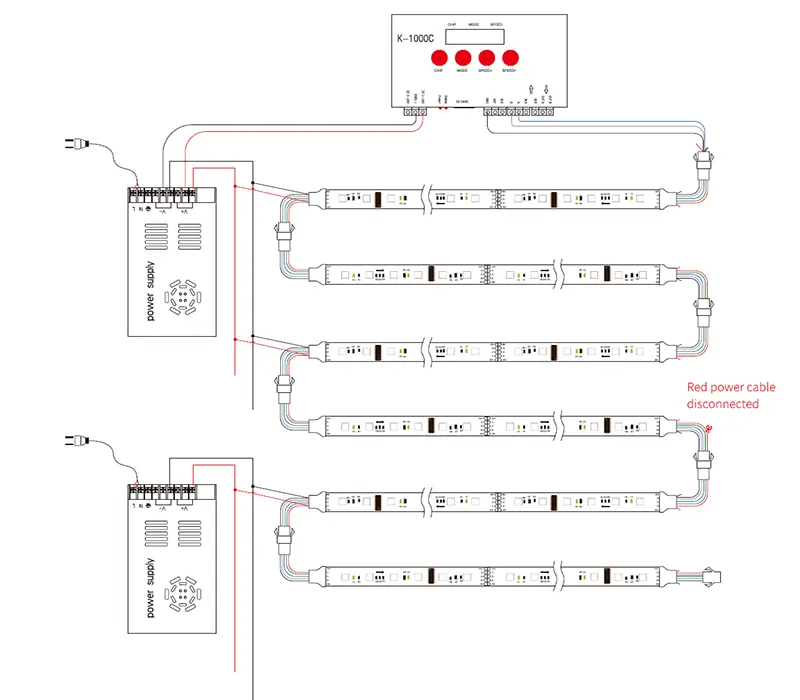
لتوصيل أسلاك شريط LED القابل للعنونة SPI، تحتاج أولاً إلى تحديد كابلات البيانات والساعة والأرضية والطاقة على الشريط. قم بتوصيل سلك الطاقة بمصدر الطاقة، والسلك الأرضي بمصدر الطاقة ووحدة التحكم، وسلك الساعة بمخرج الساعة لوحدة التحكم، وأخيرًا سلك البيانات بمخرج البيانات لوحدة التحكم. شيء واحد يجب ملاحظته هو أنك تريد اتباع اتجاه الأسهم على شريط LED SPI لضمان تدفق البيانات بشكل صحيح!
ومع ذلك، تتمثل إحدى مشاكل بروتوكول SPI في أنه بروتوكول بدون معيار دولي. لذا عليك التأكد من استخدام وحدة تحكم LED متوافقة مع بروتوكول الشريط، مثل WS2812B أو APA102.
1. أسلاك شريط الصمام الثنائي الباعث للضوء (LED) القابل للعنونة بإشارة بيانات واحدة SPI
يمكن أن تعمل شرائط SPI القابلة للعنونة بإشارة بيانات واحدة فقط بإشارة بيانات واحدة، حيث تتحكم دائرة متكاملة واحدة في منطقة تسمى بكسل. إذا تعطل أحد وحدات البكسل، تتوقف وحدات البكسل الأخرى عن العمل لأن الاتصال يتكون من سلك موجب واحد فقط وسلك سالب واحد وسلك بيانات واحد.
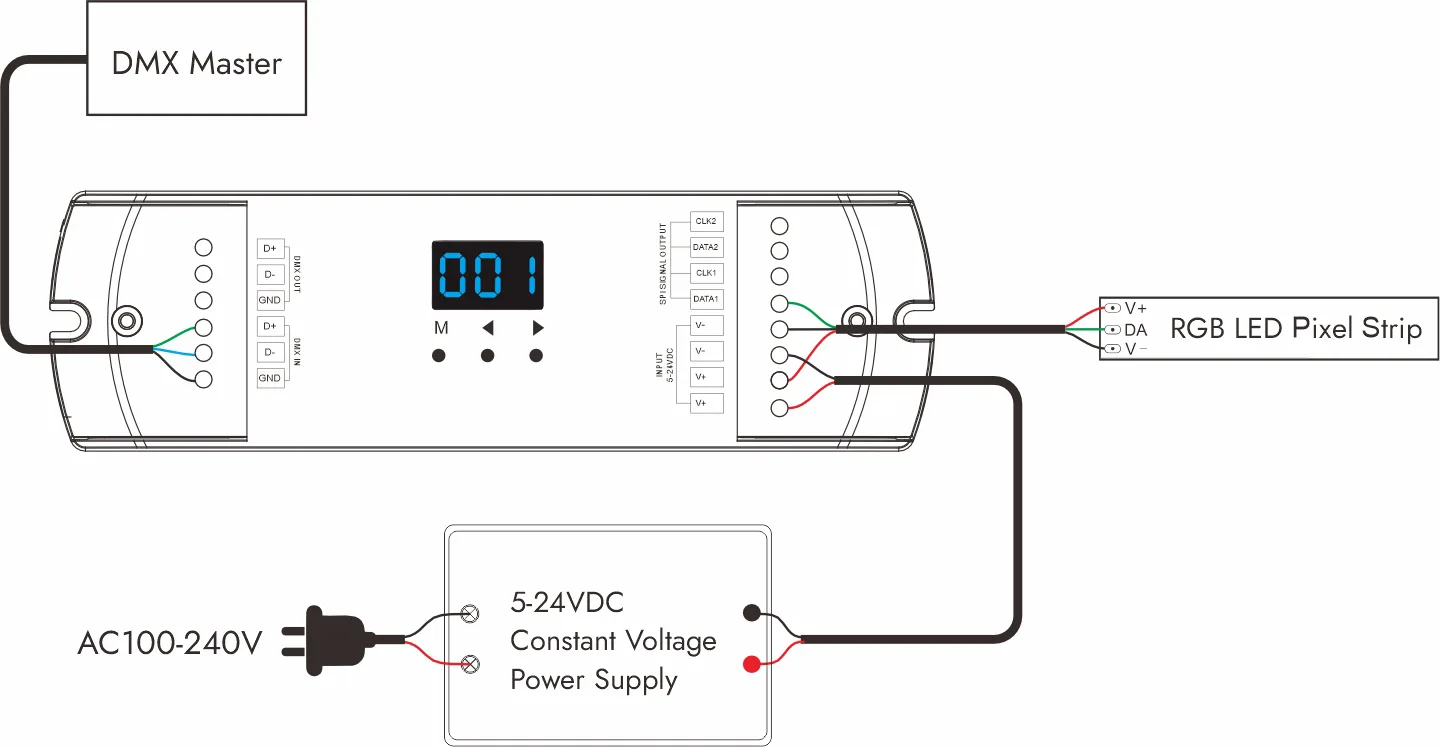
2. أسلاك شريط LED قابل للعنونة SPI مع قنوات البيانات والساعة
تحتوي شرائط LED ثنائية الإشارة القابلة للعنونة SPI على قناة ساعة بالإضافة إلى إشارة البيانات، مما يسمح لك بضبط وقت إضاءة مصابيح LED.

3. أسلاك شريط LED قابل للعنونة SPI مع قنوات البيانات وقنوات البيانات الاحتياطية
شريط LED القابل للعنونة بقناة بيانات مزدوجة SPI، ويسمى أيضًا شريط LED القابل للتكرار القابل للعنونة بنقطة توقف، هو النسخة المطورة من شريط LED القابل للعنونة بإشارة بيانات واحدة. يعتمد شريط LED القابل للعنونة على دائرة تحكم في خط بيانات مزدوج بأربع قنوات، بما في ذلك خط بيانات وخط بيانات احتياطي. عندما يفشل خط البيانات المفرد، سيبدأ خط البيانات الاحتياطي تلقائيًا لضمان عدم انقطاع إرسال الإشارات.
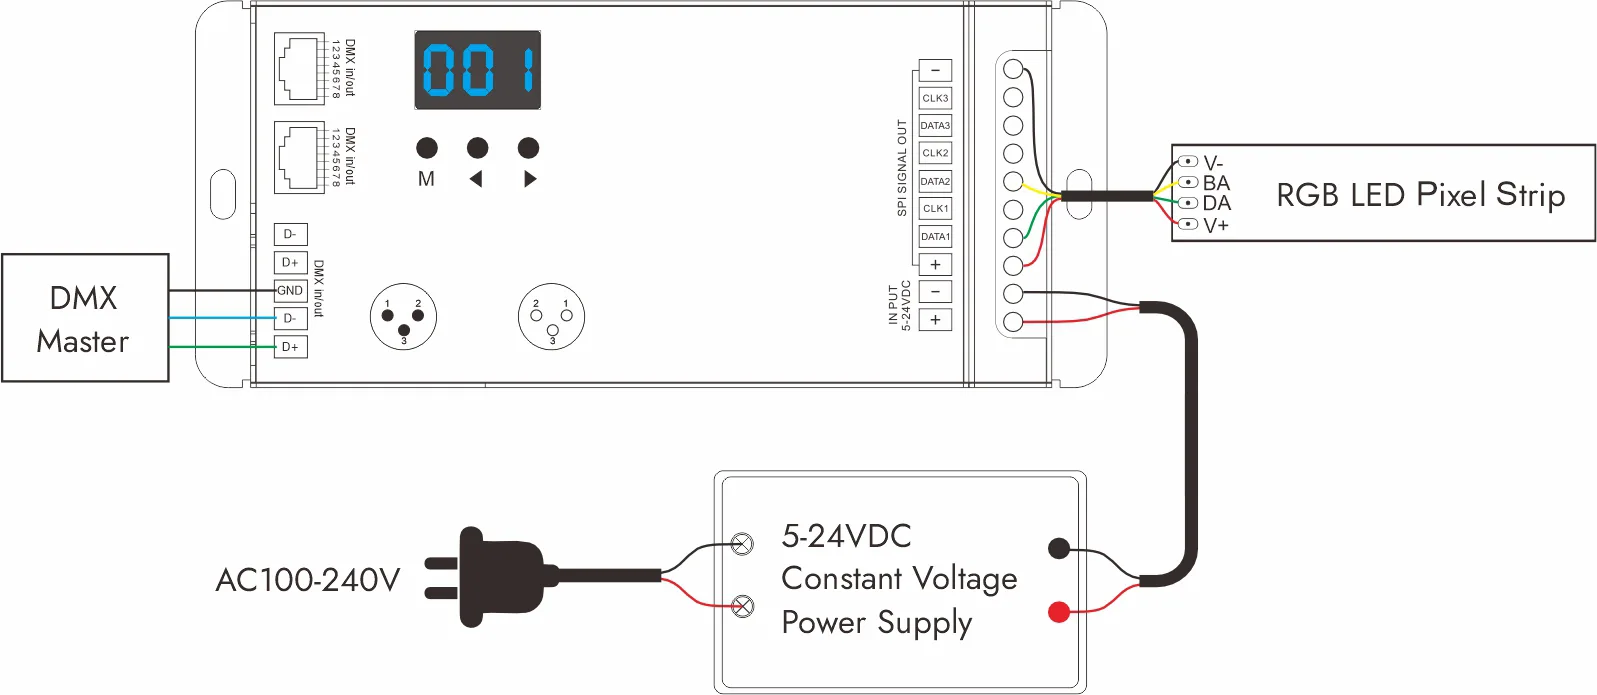
طرق توصيل مصابيح LED الشريطية القابلة للعنونة DMX
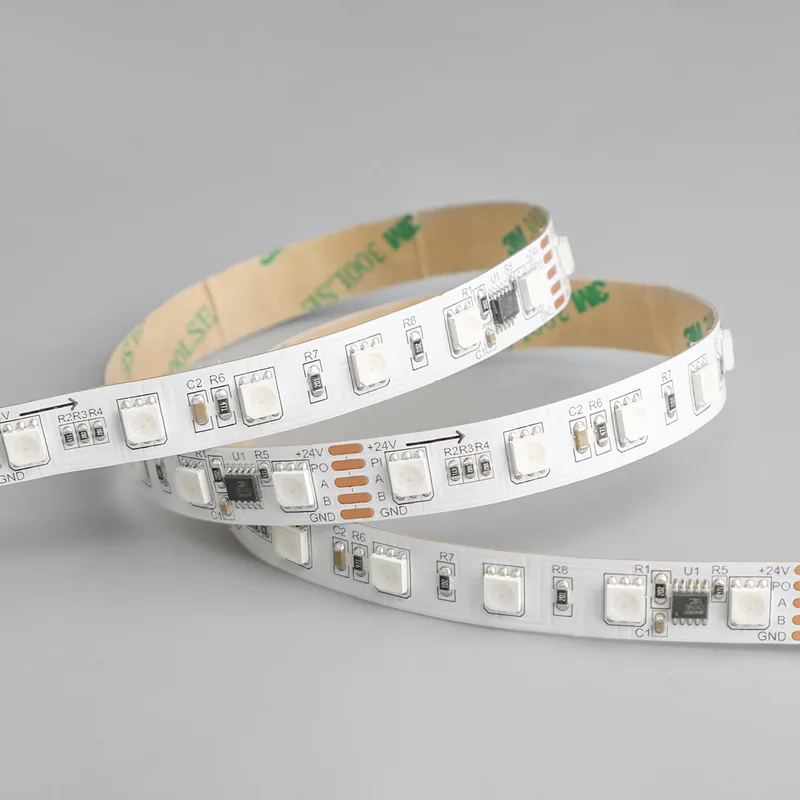
مصباح شريط ضوئي LED شريطي LED قابل للعنونة DMX
كمية مصابيح LED لكل متر: 30/32/32/60/84
نوع الدائرة المتكاملة: TM512/UCS512
عرض ثنائي الفينيل متعدد الكلور: 10 مم/14 مم
اللون: RGB/RGBW
جهد الإدخال: دي سي 5 فولت / دي سي 5 فولت / دي سي 12 فولت / دي سي 24 فولت
الطاقة لكل متر: 6.7 واط - 20 واط
درجة IP: IP20/IP65/IP67/IP68
الضمان: 3 سنوات
أضواء شريطية LED قابلة للعنونة DMX هي نوع من مصابيح LED الشريطية التي تستقبل إشارات DMX512 مباشرةً بدون وحدة فك ترميز DMX وتغيّر لون وسطوع المصابيح وفقًا للإشارات.
لتوصيل شريط LED القابل للعنونة DMX512، قم أولاً بتوصيل مدخل DMX للشريط بمخرج وحدة التحكم DMX. قم بتوصيل سلك طاقة الشريط بمصدر الطاقة، مع التأكد من تطابق الفولتية. قم بتأريض الشريط ووحدة التحكم معًا. اضبط عنوان DMX على شريط الإضاءة لتحديد موضع البداية في سلسلة التحكم DMX. يسمح لك هذا الإعداد بالتحكم في لون ونمط مصابيح LED من خلال وحدة تحكم DMX للحصول على مشاهد إضاءة دقيقة ومعقدة.

الخاتمة
يتطلب توصيل شرائط (ليد)، سواءً كانت أحادية اللون أو بيضاء قابلة للتعتيم أو RGB أو RGBW أو قابلة للعنونة فهم دور كل مكون وضمان التوافق في نظام الإضاءة بالكامل. باتباع هذه الإرشادات، تكون قد تعلمت كيفية توصيل أنواع مختلفة من شرائط (ليد).
SignliteLiteLED هو مصنع متخصص في إنتاج منتجات عالية الجودة مخصصة مصابيح شريطية LED و أضواء شريطية نيون LED. إذا كنت بحاجة إلى شراء مصابيح شريطية LED، يرجى الاتصال بنا.
